Monthly Archives: April 2012

A Golden Observation

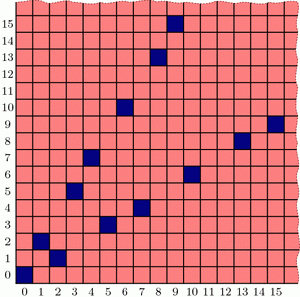
Last week we saw that the best strategy for Wythoff’s game is to always move to one of the blue squares in the diagram below (if you can). We found the locations of the blue squares with an iterative algorithm that builds outward from (0,0), but we haven’t yet discovered the underlying pattern in how these blue cells are arranged. Let’s go pattern hunting!

As we noticed last week, the blue cells are arranged in a symmetric “V” shape, formed from two seemingly straight lines. What are the slopes of these lines? This is the question du jour.
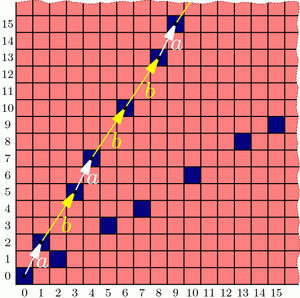
Jumps in losing positions for Wythoff's game
Jumps between blue cells for Wythoff's game come in just two sizes: a=(1,2) and b=(2,3).

Looking more carefully, the upper branch of the “V” has only two types of “gaps”: consecutive blue cells are separated by either a “short” (1,2) step (a.k.a. a knight’s move) or a “long” (2,3) step. So, if we believe that this “V” branch is a perfect line, then that line’s slope should be somewhere between the slopes of these two steps, namely \(3/2=1.5\) and \(2/1=2\). Knowing more about how these steps are arranged will tell us more about the “V”.

Specifically, label these “short” and “long” steps as a and b respectively. What we care about is the ratio of bs to as. Why? For example, if there were an equal number of as and bs on average, then the slope of the line would be the same as the vector \(a+b=(3,5)\), i.e., the slope would be 5/3. If there were, say, two bs for each a in the long run, then the line would fall in the direction of \(a+2b=(5,8)\), with slope 8/5. Unfortunately, the ratio we seek is neither 1 nor 2; what is this magic number?

Let’s write down the sequence of jumps along our line. From the diagram above we see that it starts a b a b b a …, and using last week’s iterative algorithm, we can compute farther into this infinite sequence:

a b a b b a b a b b a b b a b a b b a b a b b a b b a b a b b a b b …

This sequence seems to be composed of “blocks” of (a b) and (a b b):

(a b)(a b b)(a b)(a b b)(a b b)(a b)(a b b)(a b)(a b b)(a b b)(a b)(a b b)(a b b)…

So for every a there are either one or two bs, meaning the ratio of bs to as is somewhere between 1 and 2. So the slope should be between 5/3 and 8/5. But what is it exactly? To answer this, we need to know how these “short” and “long” blocks are arranged.

Write A = (a b) and B = (a b b), so we can rewrite the sequence of blocks as

A B A B B A B A B B A B B …

Hold on; this sequence looks familiar. It’s exactly the same pattern as our original jump sequence! So it seems that the pattern of blocks is exactly the same as the pattern of the letters themselves! This is a “self-generating” sequence!

In particular, if the ratio of bs to as is some number r, then the ratio of (a b b) blocks to (a b) blocks is also r. But if we have one block of (a b) and r blocks of (a b b) then we have a total of \(1+2r\) bs and \(1+r\) as, so the ratio of bs to as is \(\frac{1+2r}{1+r}=r\). This simplifies to \(1+r=r^2\), and the solution is the shiny number \(r=\frac{1+\sqrt{5}}{2}\), known as the golden ratio and denoted \(\phi\) (Greek letter phi).

Now we know that our purported line should be in the direction of \(a+b\cdot\phi = (1+2\phi,2+3\phi)\), so the slope is \((2+3\phi)/(1+2\phi)=\phi\). And since our “V” shape is symmetric, the other line should have slope \(1/\phi = \frac{\sqrt{5}-1}{2}\). Done and done!

Well, yes and no. We found the slopes of the lines in the “V”, but why do they form lines at all? And what does all this have to do with the Fibonacci numbers?
Wythoff’s Game: Red or Blue?

Let’s play a game; just the two of us. We’ll need a (potentially large!) chess board and a single queen somewhere on the board. We take turns making queen moves, always making progress toward the bottom-left corner of the board. Specifically, in one turn we are allowed to move the queen as far as we want either straight down, straight left, or diagonally down and left (at a 45-degree angle). The first to land the queen on the bottom-left corner wins the game. If you go first and we both play as best as possible, who wins? Well, it depends on where the queen started.

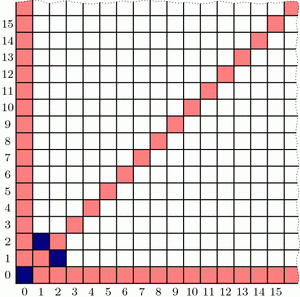
If the queen starts at any of the light-red spaces in the diagram below, you can win on the first move by going straight to the bottom-left corner. On the other hand, if the queen starts at (2,1), then you’re sunk: any move you make lands on a red square and so leaves me in a position to win. So (2,1) is a losing position, indicated by dark blue shading. (The jagged edge reminds us that we could ask the same questions on much bigger grids.)

Wythoff's game: beginning analysis
If the queen starts on a light-red cell, you win on the first move. If she starts on (1,2) or (2,1) (dark blue), you lose.

What should you do if the queen starts at, say, (6,5)? Move to (2,1)! This leaves me in a losing position, so no matter how I respond, you’ll win. So once we find where all the blue losing cells are, your strategy should be: always move to a blue cell, if you can. What if you can only land on red cells? Then you must have started at a blue position, and you’re going to lose.

This also tells us how to find the losing positions, step by step. We know that (2,1) and (1,2) are losing positions, so any position that can reach these in one move is a winning position. But now (3,5) and (5,3) can only reach red cells, so they are blue, and in turn, anything that can directly reach (3,5) or (5,3) is red.

Wythoff's game: continued analysis
Finding blue cells step by step. Left: Because (1,2) and (2,1) are blue, any cells that can reach these directly are red. Right: (3,5) and (5,3) can only reach red cells, so we color them blue. This reveals even more red cells.

Continuing like this, we can fill up our board as follows:

Wythoff's game: completed analysis
Continuing step-by-step as above, all blue cells in the grid are revealed. What patterns can we find?

Interestingly, the blue positions seem to fit nicely into two straight lines forming a “V”-shape, but the exact pattern governing their placement is less clear (especially if we were to ask about larger grids!). Is there more underlying structure in the blue cells’ positioning?[1] How could we discover the pattern in their placement? And why does that line seem to have slope equal to the golden ratio, \(\phi = (1+\sqrt{5})/2\)?[2] Tune in next week to find out! In the meantime, be sure to play a few rounds of Wythoff’s game with your friends!


Notes

  1. Yes. We call that a leading question… []
  2. Correction: that is a leading question. []

Three-Cornered Deltoids

[This is the third and final post in this series on triangle geometry. See the previous posts on Morley’s theorem and the 9-point circle.]

For our final exploration in this series, let’s again begin with our triangle ABC and a point P on the circumcircle of the triangle, i.e., the circle through the three vertices. If we drop P directly onto the three lines of the triangle at right angles[1], then by coincidence, these three points lie on a single line, called the Simson line of point P.

The Simson line of point P in triangle ABC

Just for fun, let’s draw point Q diametrically opposite from P on the circumcircle, and let’s also look at Q‘s Simson line. How do these two Simson lines interact? Somewhat surprisingly, these lines intersect at right angles. The phenomenal part is that this point of intersection lies on the 9-point circle!

Two opposite Simson lines

Furthermore, as P and Q move around the circumcircle, the intersection of their Simson lines moves around the 9-point circle at twice the speed and in the opposite direction:

Simson lines tracing the 9-point circle

This story gets even more unbelievable when we look at how the Simson lines move in this animation. As it turns out, the Simson lines trace a curve in the shape of a deltoid, which is like an equilateral triangle with curved sides[2]. The deltoid traced here is called Steiner’s deltoid.

Simson lines trace the Steiner deltoid

And finally, here’s an incredible fact that ties everything together: If we draw the equilateral triangle around this deltoid, then the edges are parallel to the edges of the equilateral Morley triangle(s).

Steiner deltoid and Morley triangle

Holy Morley!


Notes

  1. Note that we may have to extend the lines beyond the triangle. []
  2. Specifically, a deltoid is the shape that results when you roll a circle inside a circle three-times larger and trace the path of a single point. See Wikipedia:Deltoid_curve for more information. []