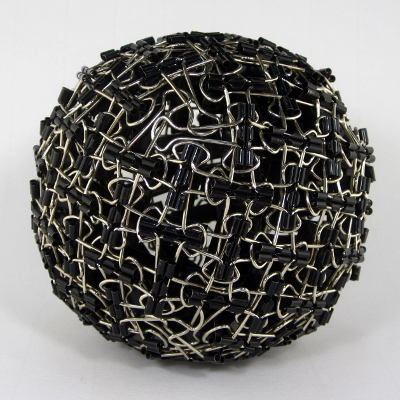
By popular demand, I am posting instructions for how to make your own Impenetraball, one of my most popular sculptures. Be warned; this is not easy, but it is certainly rewarding. And potentially lethal, in more ways than one…
Geometry of the Impenetraball
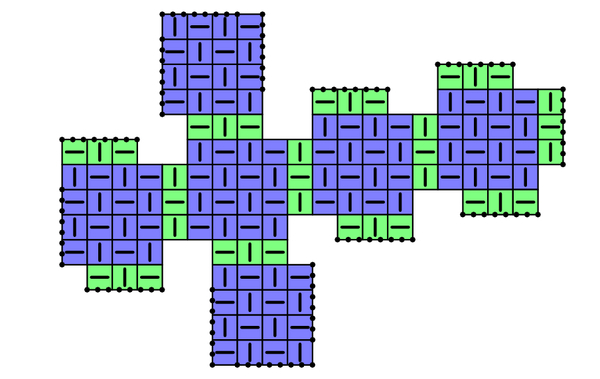
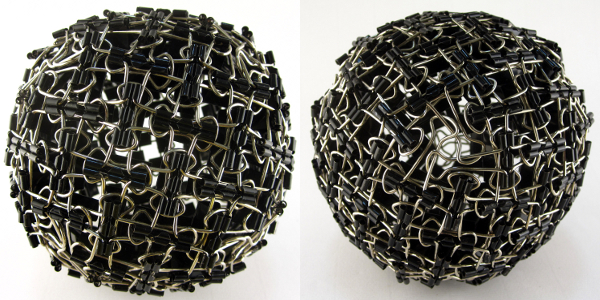
First, we must understand the geometry of the Impenetraball. Despite its spherical appearance, the pattern is based on a cube. As illustrated in the schematic above (each square cell represents one binder clip), there are six 4×4 grids of clips that correspond to the faces of a cube (shown in blue), and these faces are joined with additional clips (green) along the cube’s 12 edges. Note that the faces are not joined head-on; instead, they are offset by 1 clip from their neighbors, and this “twist” leaves a triangular hole at each of the cube’s 8 vertices vertices. The face and corner features are shown below.
The main Impenetraball page goes into a bit more depth about the piece, if you wish to read more.
Build Your Own: Getting Started
To get started, you will need 132 binder clips (more on this shortly), a pair of needle-nose pliers, and plenty of time.
Step 1: Choosing your Clips
First, be sure to get the correct size binder clips: you want the standard size, which Staples calls “small” (not tiny!). The “tiny” clips do not have long enough handles, and the larger clips have thicker handles which are much more difficult to manipulate.
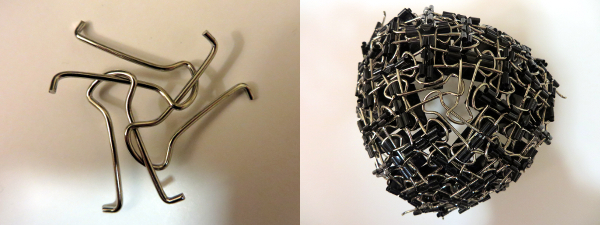
I buy most of my binder clips from Staples, but much to my surprise, these clips seem to possess markedly distinct species of handle shapes, all sold under the same product number!
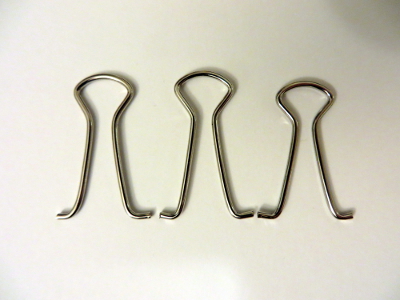
Shown above are the three characteristic families I have encountered: left to right, they are: long with a wide neck, long with a narrow neck, and short with a narrow neck. For the Impenetraball, I personally favor the smallest (i.e., short and narrow) handles, as this results in a noticeably denser grid and increased stability. However, this also makes construction significantly more difficult. More practically, I suggest just buying (or otherwise acquiring…) some clips (of the correct size!) and using whatever you end up with.
Step 2: The Basic Unit
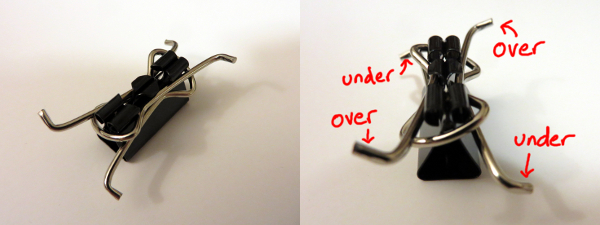
For the basic unit, take a single clip, remove the handles, and wrap them around the body as shown. Be careful to tilt the handles to match the over/under pattern labelled in the second image above, instead of its mirror image. (Note: the over/under detail is purely for aesthetic purposes and may be safely ignored for those less pedantic than I.)
Step 3: Begin Joining the Units
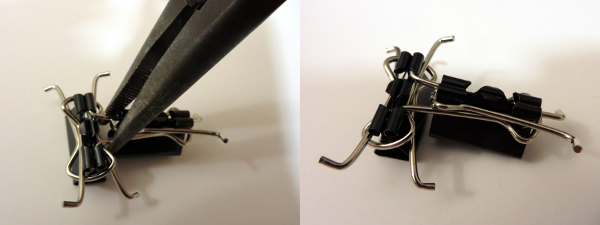
Adjacent units are joined as shown here. I strongly recommended using needle-nose pliers, especially for later steps as the ball gets tighter and more warped.
Step 4: Build a 2×3 Grid, and “In” vs “Out”

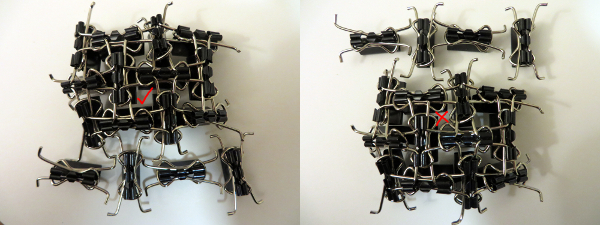
Continue building up a grid. At a 2×3 rectangle, stop to notice that one square has all of its handle curves pointing “out” toward you (shown on the left), while the other square has handle curves pointing “in” away from you (right). These “out” and “in” squares will alternate in a checkerboard pattern across the entire finished piece.
Step 5: Finish a 4×4 Face
Continue building up to a 3×4 grid. We will next complete this into a 4×4 grid, but we must be careful here: there are two ways to complete the 3×4 into a 4×4, and you must choose the one that leaves an “out” square in the middle. Equivalently, the bottom-right clip in your 4×4 grid should be aligned vertically, to match the images here. Note well: this time, the careful choice is not simply one of aesthetics or pedantry. If your faces are not oriented consistently, they will not fit together later.

This 4×4 grid will end up being a face of a cube as explained above. You will therefore eventually need 6 of these 4×4 faces, which accounts for 96 of the 132 clips that we will use. The rest of the clips are used for the edges.
Step 6: Join two Faces at an Edge
We can now begin assembling the cube by joining two faces with three additional “edge filler” clips as shown. Note that the two faces do not align straight on: the bottom face is shifted one unit to the right. (Equivalently, the two corners marked with an X are left unmatched by this edge.) This is what will leave triangular gaps at the cube’s corners. Note also that two of the “edge filler” clips are missing one of their handles. Set these aside for later use (namely, for filling corners).
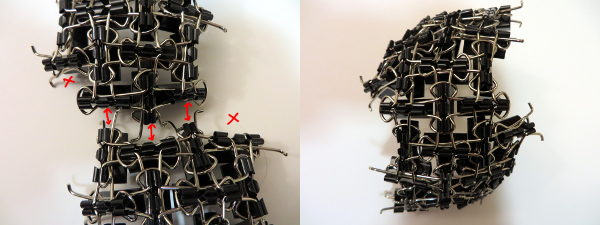
To join this edge, first attach the three “edge filler” clips to one of the faces, and then join these two assemblies together as illustrated.
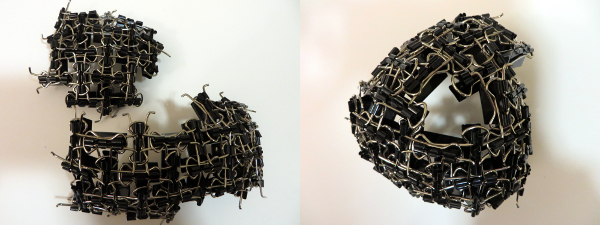
Step 7: Attach a Third Face
It is time to attach the next face just as we attached the first. There are now two cube edges being formed, so use 6 “edge filler” clips along the two edges, making sure the alignment is the same as before: at each edge, the bottom face is shifted one to the right relative to the top face. There should be a nice, symmetric triangular hole between the three faces.
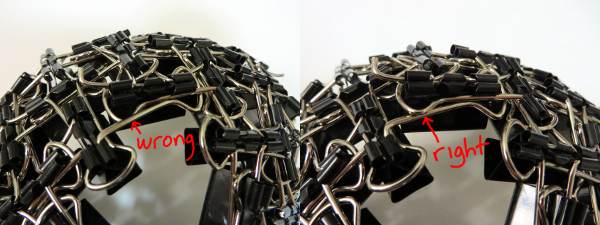
I find it easiest to attach the edge filler clips to the new face (shown left), and then joining this to the existing assembly (shown in progress on the right). Even so, this step is quite resistant. It takes a decent amount of patience and forcing, which is why pliers are essential. If you are minding the over/unders, this pattern is often disrupted by all the rough-housing (as illustrated below), so carefully check it as you go and correct it as soon as possible.
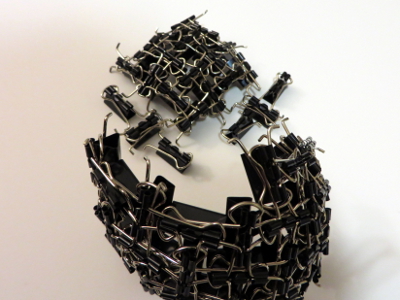
For all our troubles, here is the final three-face assembly!

Step 8: Close off a Corner
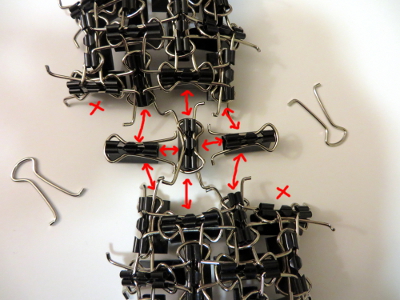
Now that one of the 8 corners of the cube is completed, we can fill it in! Take 3 of the leftover handles, weave them as shown, and insert them into the corner. You will repeat this 7 more times after the remaining corners are surrounded.
Step 9: Keep Going!
Almost there! You now have all the tools you need to finish: there are just three more faces to join along 9 more edges, and 7 more corners to close off. All of the steps are the same as before: double-check the alignment when attaching edge filler with faces, and (I find this easier) always attach all necessary edge filler to the new face before joining to the existing assembly. If the third face was tough to attach, the rest are even more difficult, but just keep forcing things into place until it all clicks (literally). Best of luck!
One thought on “How to Make an Impenetraball!”