Category Archives: Games/Experiments

More Putting Predicaments

Last time we discussed some rather challenging holes of (mathematical) mini-golf, uncovering Tokarski’s construction of some un-hole-in-one-able holes. By contrast, here is the all-time easiest hole of mini-golf, namely, a guaranteed hole-in-one:

Reflections in an Ellipse
In an ellipse, any golf shot from focus \(F_1\) will bounce directly to the other focus, \(F_2\).

By some miracle of geometry, if we take an ellipse (i.e., a stretched or squashed circle) and place the ball and cup at two special points \(F_1\) and \(F_2\) called the foci of the ellipse, then any golf shot leaving \(F_1\) will bounce off a wall and proceed directly to \(F_2\).[1] You can’t miss![2]

Curiously, this easiest golf hole can be used to construct some even more challenging ones. For starters, consider a mushroom-shaped room as illustrated below (left), where the “mushroom head” is half of an ellipse with foci \(F_1\) and \(F_2\). Then the same reflection principle mentioned above tells us that any shot entering the mushroom head via segment \(F_1F_2\) will be reflected straight back through \(F_1F_2\) and sent back down the stem. This means that no shot from P can ever reach the triangular “fang” containing Q, and in particular, no hole-in-one from P to Q is possible. In the mirrored-room setting (described last time), if a light source is placed at P, then the whole triangular fang remains unilluminated! This is stronger than Tokarski’s room, where only a single point remained unlit. Similar constructions are possible even with rooms that have no corners[3], such as the “curvy” mushroom on the right.
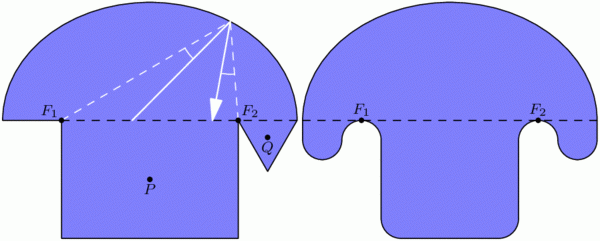
Mushroom-shaped mini-golf holes
Left: Any path entering the mushroom head from segment \(F_1F_2\) will be reflected back down through this segment, so the triangle containing Q is not reachable from P. Right: The same phenomenon is possible even when the room has no corners.

With this idea, we can construct a mirrored room that has dark patches no matter where a light bulb is placed. In the image below, if a light source is placed anywhere in the top half of the room, the lower triangular “fang” will be completely dark. Similarly, the upper fang is not illuminated from anywhere in the bottom half of the room. This room (or one quite like it) was originally designed by Roger Penrose in 1958.
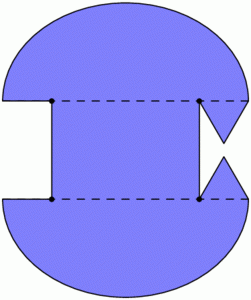
The Penrose Room
This room will have dark regions no matter where the light source is placed.

Back in the mini-golf setting, we can do something even more devious: by chaining multiple Penrose rooms together, we can construct golf holes that require as many shots as we wish! The golf hole below cannot be completed with fewer than 7 shots. Indeed, no single shot can cross two dashed segments with different numbers, so 7 shots are required.[4]
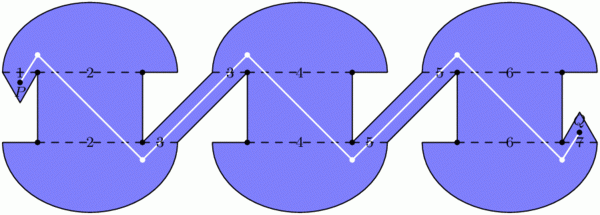
Minigolf hole needing 7 shots
At least 7 shots are required to get from P to Q.

What about polygons?

The golf holes last time were all polygons, whereas we have allowed curved boundaries here. Can we construct a polygonal golf hole, using only flat walls, that still requires at least 7 shots? Or even 3? Unfortunately, the answer this time is “we don’t know, but we think not.” In particular, it has been conjectured that, no matter where the ball and cup are placed in a polygonal golf hole, a single shot can place the ball as close to the hole as desired, so a short second putt can finish the job.[5]


Notes

  1. In fact, even more is true: all of these paths from \(F_1\) to \(F_2\) have the same length! We will not prove these facts today. []
  2. Assuming you hit hard enough, of course. []
  3. For the analysts out there, the room’s boundary can be made smooth. []
  4. This too can be accomplished with smooth boundary. []
  5. More strongly, O’Rourke and Petrovici conjecture that with a single light source in a polygonal room, the set of unilluminated points has measure 0. Reference: Joseph O’Rourke and Octavia Petrovici. Narrowing Light Rays with Mirrors. Proceedings of the 13th Canadian Conference on Computational Geometry, 137–140, 2001. []

How Unilluminating!

You are standing in a large, oddly-shaped room, all of whose walls are lined with mirrors. Everything is dark except for a single light bulb somewhere else in the room. The light from this bulb spreads out in all directions and bounces off the mirrors, possibly many times over. Is it possible that, despite all the mirrors, you could still be standing in the dark, unable to see light from this bulb from any direction?

Said differently, consider the room as a large hole of mathematical mini-golf, where the locations of the ball (just one point) and cup (also just a point) are predetermined. Your goal is to pick a direction to hit the ball, hoping that it will reflect off the walls and eventually find its way to the cup. Is a hole-in-one always possible?

Perfect Reflection
When a light ray hits a wall, it bounces off in such a way that the angle of incidence (top left) equals the angle of reflection (top right). In other words, the dashed trajectory is reflected through the line of the mirror.

We assume that when a ray of light (i.e., the golf ball) hits a mirror, it reflects perfectly, as illustrated above. Let’s also assume that it never loses energy, so it will continue as far as necessary to reach its destination. There’s one corner case to consider, namely, what happens if the ray hits a corner of the room? Well, it’s (usually) ambiguous as to where it should reflect next, so let’s say that the ray just dies if it hits a corner. In the mini-golf formulation, our hole-in-one must avoid the hole’s corners.

With these rules in place, it turns out that it is possible to be left in the dark, or to make a hole-in-one impossible! One of the first examples, provided by Tokarski in 1995[1], is illustrated below; let’s call this room R.

An unilluminable room
No light ray from P can exactly reach Q.

Let’s see why this room R works, i.e., why point Q is not illuminated by a light source at P.

Notice that R is built from identical square cells. As our ray of light continues through the room, we can keep track of where it is in its current cell—but not which cell it is in—by imagining that the ray is just bouncing around in a single square, as illustrated below. Call this single square S. We are essentially folding up the light ray’s trajectory into S.

Shooting a ray in Tokarski's room
An example light ray reflecting off the walls in Tokarski’s room, and the corresponding “folded” trajectory in a single cell (top middle). This ray gets very close to Q, but it will never reach it exactly. The grid is colored in a repeating pattern where each cell has 1 light yellow corner and three dark purple corners.

Color the grid points with light yellow and dark purple as illustrated above; in particular, P and Q are both yellow. Tokarski’s room has the interesting property that every dark purple point is in fact a corner of the room, so if the ray hits there, it dies. This means that the corresponding ray in square S would die when hitting one of the purple corners. So, in order for the light to reach Q in Tokarski’s room, the corresponding path in S must start at the yellow corner, end back at this same corner, and completely avoid the purple corners of the square. I claim this is impossible. Why?

Just as we folded room R into a single square, let’s consider unfolding square S to cover the whole plane. Because we’ve assumed perfect reflections, our trajectory in cell S unfolds to a straight line!

Unfolding the Ray
“Unfolding” the the light’s trajectory in the square produces a straight path in an infinite grid of squares.

This means that we would need to find a straight trajectory from the initial yellow point to some other yellow point that does not hit any purple points. But this is impossible: all the yellows are blocked by purples![2] So the light can’t get from P to Q in Tokarski’s room, as claimed.

This room R is not the only example of an unilluminable room; with similar methods, many such rooms may be constructed. For example, in an effort to find an unilluminable room with the smallest number of edges, Tokarski provided the 26-sided polygon below on the left, which was then improved by Castro[3] to a 24-sided polygon on the right.[4] Both are built from 45-45-90 triangles instead of square cells.

Tokarski's and Castro's "minimal" unilluminable rooms
Tokarski’s 26-sided unilluminable polygon (left) and a 24-sided modification by Castro (right).

Tokarski also provides the gem below (with no right angles!), and his paper gives recipes for a wide variety of other shapes.

Unilluminable room with no right angles
Another of Tokarski’s unilluminable rooms, this time with no right angles. The basic unit here is a triangle with angles 9, 72, and 99 degrees.

Here’s a challenge: so far, we’ve seen that it is possible to design a mathematical mini-golf hole that requires at least 2 shots. Can we make an even harder hole? Can we design one that needs at least, say, 10 shots? We’ll discuss this next time. See you then!


Notes

  1. George W. Tokarsky. Polygonal Rooms Not Illuminable from Every Point. American Mathathematical Monthly, 102:867–879, 1995. []
  2. Here’s a proof: given any yellow-yellow segment, its midpoint lies on the grid. If this midpoint is purple, then we’re done. Otherwise, take half of the original segment and repeat this argument. []
  3. D. Castro. Corrections. Quantum 7:42, 1997. []
  4. It is not known whether 24 is minimal. []

Fibonacci-Based Arithmetic

[This is the final Wythoff’s game post. See the previous ones here: #1, #2, #3, #4, #5, #6. We’ll have a few shorter, 1- or 2-post topics starting next week.]

In our standard, base-10 number system, each position represents a specific power of 10: the number 275 in base 10 means that I have five 1s, seven 10s, and two 100s. Similarly, in the base-2 system, each position represents a different power of 2: 10011 in base 2 says I have a 1, a 2, and a 16, but no 4s or 8s.[1] Instead of using powers of 10 or 2, what happens if we use Fibonacci numbers?

We can find the Fibonacci numbers by starting[2] at \(a_1=1\) and \(a_2=2\) and then computing each term as the sum of the two previous ones, \(a_n=a_{n-1}+a_{n-2}\):

1, 2, 3, 5, 8, 13, 21, 34, 55, …

Let’s use these as our position values in our so-called Fibonacci base, using just the digits 0 and 1. For example, 1010011F stands for \(a_7+a_5+a_2+a_1 = 21+8+2+1 = 32\).

Notice that \(a_2+a_1=a_3\), so we can write 32 instead as \(a_7+a_5+a_3\), meaning 32=1010100F. In much the same way, any time we have a Fibonacci representation of a number, we can repeatedly use the identity \(a_n=a_{n-1}+a_{n-2}\) to ensure that we never use consecutive Fibonacci numbers:

Theorem (Zeckendorf): Every positive integer can be expressed in base Fibonacci with no adjacent 1s. Furthermore, this representation is unique.

The “base-Fibonacci representation” of a number usually refers to its Zeckendorf representation as in this theorem. There’s a simple greedy method to find a number’s Zeckendorf representation: use the largest Fibonacci number less than (or equal to) your number, and repeat on the remainder. For example, to represent 46 in this way, check that the largest Fibonacci number below 46 is \(a_8=34\), leaving 12 as the remainder. The largest Fibonacci number below (or equal to) 12 is \(a_5=8\), with a remainder of 4. Now we have to use \(a_3=3\), and finally we’re left with \(1=a_1\). So \(46=a_8+a_5+a_3+a_1=10010101_F\) is the Zeckendorf representation of 46.

But why discuss base Fibonacci now? What does this have to do with Wythoff’s game? Zeckendorf representations provide another simple way to characterize the losing positions in Wythoff’s game! Here’s a beautiful result:

Theorem: If \(a \le b\) are positive integers, then \((a,b)\) and \((b,a)\) are losing position in Wythoff’s game precisely when:

  • The Zeckendorf representation of a ends in an even number of 0s, and
  • The Zeckendorf representation of b is the same as that of a except for one more 0 on the end.

For example, 11=10100F ends in two 0s (two is even), and 18=101000F has the same representation except for an extra 0 at the end, so (11,18) and (18,11) are Wythoff losing positions. Unlike the formula using multiples of \(\phi\) and \(\phi^2\) that we proved in the last few posts, this provides a method we could actually compute (without a calculator) on reasonably-sized grids when playing with friends (or enemies)! After all we’ve learned about Wythoff’s game, we finally have a way to win it!

Further Reading

Our Wythoff’s game saga is now ending here on Three-Cornered Things, but here are a few recommended resources if you wish to further explore this rich topic on your own:


Notes

  1. If these concepts are unfamiliar, see this previous post on number bases. []
  2. Careful: these indices are shifted from the other common convention that starts the Fibonacci numbers at \(F_1=1\) and \(F_2=1\), which is why I’m using as instead of Fs. []

Putting the Why in Wythoff

Last week we drew dots at multiples of the vectors \(v=(\phi,\phi^2)\) and \(w=(\phi^2,\phi)\), and we colored grid-cells green or yellow according to whether they contain a dot or not. Our remaining task was to prove these three facts:

  • Endgame condition: The cell (0,0) is green.
  • Greens lose: From a green cell, there are no other green cells accessible with a single Wythoff’s game move.
  • Yellows win: From any yellow cell, it is possible to move to a green cell with one Wythoff’s game move.
Our guess at the solution to Wythoff's game
Our guess at the solution to Wythoff's game: multiples of vectors v and w (dotted) and their containing cells (dark green).

The “Endgame” condition is easy: the dot at \(0\cdot v = (0,0)\) makes cell (0,0) green. One condition down, two to go!

The “Greens lose” condition asks us to show that no two green cells are in the same row, column, or (slope 1) diagonal—otherwise, you could get from one to the other with a Wythoff move. In fact, we will prove something stronger:

Covering Theorem: Every row, column, and diagonal contains exactly one green cell.

Pictorially, this says that each thick line in the diagrams below will hit one and only one green cell:

Covering the columns and diagonals
All columns (left), diagonals (right), and rows (not pictured) contain exactly one green cell. (Some of these green cells are beyond the image boundaries.) Because the green cell locations are symmetric through the line y=x, the diagram for the rows is redundant and therefore omitted.

It is not difficult to describe why each diagonal is covered, i.e. has exactly one green cell. In the diagram on the right, the central diagonal line has equation \(y-x=0\); the one above it has equation \(y-x=1\); the next is \(y-x=2\); and so on. And because \(\phi^2-\phi=1\), the vector v jumps from one diagonal line to the next at each step. Vector w similarly jumps from line to line in the other direction.

By contrast, I find the fact that each column is covered quite surprising. It says that the upper and lower branches of the “V” perfectly complement each other, each filling exactly the columns that the other skips! Before we prove this fact, let’s see why it helps us.

If we assume the covering theorem for now, we can finish the three conditions needed for our proof. We already saw that (0,0) is green, and the covering theorem certainly tells us that each row, column, and diagonal has at most one green cell, so the “Greens lose” condition holds. We just have to prove the “Yellows win” property: that you can always move to a green cell from any yellow cell. The idea is simple: if your yellow cell is above the “V”[1] then move down to the unique green cell in your column (which may be on either the upper or lower “V” branch). If you are below the “V”, move left to the green cell in your row. Finally, if you are inside the “V”, move diagonally. In this way, you can always move to a green cell with one Wythoff move.

Proving the "Yellows win" condition
All yellow cells can reach a green cell with one Wythoff move. Yellow cells above the "V" can move down to a green cell; yellow cells below the "V" can move left to a green cell; yellow cells inside the "V" can move diagonally to a green cell.

With this third and last property verified, we’re finally done with our proof! …except that we still need to prove the mysterious covering theorem. We’ll discuss this next week. Come back then for the exciting QED!


Notes

  1. i.e., its lower-left corner is above the line \(y=\phi\cdot x\) []

Wythoff’s Formula

Welcome back! I took a few-weeks’ blogging hiatus to focus on end-of-term craziness, but I am now resuming a regular(ish) weekly schedule throughout the summer. Let’s get back to Wythoff’s game!

Here’s a brief recap: In trying to solve for optimal play in Wythoff’s game, we saw how to algorithmically find the blue “losing positions”; we observed that these seemed to lie on two lines and, assuming this fact, we computed the lines’ slopes to be \(\phi\) and \(1/\phi\); and we saw how the Fibonacci numbers were hiding all over the place. But one question lingers: why lines? We’ll answer this today.

Two posts ago, we saw that if we take all of the (infinitely many) steps in the upper “V” branch and average them together, the result has slope \(\phi\). In fact, with a little more work we can compute this “average step” exactly, not just its slope: it is the vector \(v=(\phi,\phi^2)\).[1] Let’s compare these average steps, namely v, 2v, 3v, etc., with the actual ones:

Overlaying average steps on Wythoff's grid
Drawing a dot at each mutliple of the "average" step v reveals a perfect correspondence between dots and blue cells.

The dots and blue squares are perfectly matched! It seems that this may provide a precise way to easily locate all the blue cells in the upper “V” branch at once! And since the whole diagram is symmetric through the line \(y=x\), the lower “V” branch should be governed by vector \(w=(\phi^2,\phi)\) in the same way. Thus, a hypothesis forms:

Conjecture: The losing cells in Wythoff’s game are exactly those that contain an integer multiple of vector \(v=(\phi,\phi^2)\) or vector \(w=(\phi^2,\phi)\).

If we use the notation \(\lfloor x\rfloor\) for the floor function that rounds x down to the nearest integer[2], then this conjecture says that the nth blue cells on the upper and lower “V” branches have coordinates \((\lfloor n\cdot\phi\rfloor, \lfloor n\cdot\phi^2\rfloor)\) and \((\lfloor n\cdot\phi^2\rfloor, \lfloor n\cdot\phi\rfloor)\) respectively. (When \(n=0\), both formulas give (0,0).)

As we will see, this conjecture is indeed correct. How could we rigorously prove this fact?

To start, in a new grid, let’s color green all cells that fit our hypothesized formula, i.e., contain a multiple of v or w. Fill the rest of the cells with yellow. We now have two separate, a priori unrelated colorings of the grid: one with red/blue according to Wythoff’s game, and another with yellow/green according to vectors v and w.

Comparing Wythoff grid colorings
Two colorings of Wythoff's grid that we conjecture are identical. Left: the losing positions (dark blue) found previously by an iterative, optimal-play strategy. Right: multiples of vectors v and w (dotted) and their containing cells (dark green).

Proving the conjecture amounts to showing that these colorings are the same. We’ll accomplish this by showing that the yellow/green coloring behaves just like the red/blue one:

  • Endgame condition: The cell (0,0) is green.
  • Yellows win: From any yellow cell, it is possible to move to a green cell with one Wythoff’s game move.
  • Greens lose: From a green cell, there are no other green cells accessible with a single Wythoff’s game move.

We have already observed these three properties for the red/blue coloring, and we saw that they uniquely determined the red and blue cell positions. If we could show the yellow/green coloring follows the same pattern, we could conclude that the colorings are indeed identical. So we just need to check that our yellow/green formula satisfies these three conditions!

Now that we have set the stage to dig into the meat of this proof, it is time to bid farewell until next week. See you then!


Notes

  1. Indeed, since we know that a=(1,2) and b=(2,3) appear in proportion 1 to \(\phi\), the average step is \(\frac{1}{1+\phi}a+\frac{\phi}{1+\phi}b = (\phi,\phi^2)\). This can also be computed from the Fibonacci observations in the most recent post. []
  2. For example, \(\lfloor 2.718\rfloor = 2\), \(\lfloor 5\rfloor = 5\), and \(\lfloor -3.14\rfloor = -4\). []

The “Fibonacci”est String

The celebrated Fibonacci Sequence is defined by setting each term equal to the sum of the two previous terms, starting at \(F_0=0\) and \(F_1=1\). So it continues like this:

0, 1, 1, 2, 3, 5, 8, 13, 21, 34, 55, 89, 144, 233, 377, …

What’s the relation to last week‘s infinite jump sequence,

a b a b b a b a b b a b b a b a b b a b a b b a b b a b a b b a b b … ?

Let’s find out!

Recall from last week that we can group our sequence into blocks of \(A=(ab)\) and \(B=(abb)\), and that the pattern of “short” and “long” blocks is the same as the pattern of as and bs in the original sequence:

Grouping the Jump Sequence, Level 1 This means we can do this grouping again! Specifically, we can group our sequence into “blocks of blocks”, or level 2 blocks, that look like \(A_2=[(ab)(abb)]\) and \(B_2=[(ab)(abb)(abb)]\):

Grouping the Jump Sequence, Level 2 Furthermore, the pattern of short and long level 2 blocks is still the same as the original jump sequence! So we can keep going, grouping our sequence into level 3 blocks \(A_3=A_2 B_2\) and \(B_3=A_2 B_2 B_2\), level 4 blocks \(A_4=A_3 B_3\) and \(B_4=A_3 B_3 B_3\), and so on, thus finding longer and longer patterns that fill up our sequence. Here’s level 3:

Grouping the Jump Sequence, Level 3 One natural question is: what are the lengths of these blocks? Let’s make a table:

n An Bn An Length Bn Length
0 a b 1 1
1 ab abb 2 3
2 ababb ababbabb 5 8
3 ababbababbabb ababbababbabbababbabb 13 21

The lengths are exactly the Fibonacci numbers! (Prove this!) Furthermore, how many as and bs does each block have? Here’s another table:

n An # of as # of bs Bn # of as # of bs
0 a 1 0 b 0 1
1 ab 1 1 abb 1 2
2 ababb 2 3 ababbabb 3 5
3 ababbababbabb 5 8 ababbababbabbababbabb 8 13

Again the Fibonacci numbers! This gives us another way to compute the ratio of as to bs in the jump sequence: The ratios of bs to as in blocks An and Bn are \(F_{2n}/F_{2n-1}\) and \(F_{2n+1}/F_{2n}\) respectively, so as n gets larger these ratios should both approach last week’s answer, the golden ratio \(\phi\).

OK, so our jump sequence is very “Fibonacci”y: it has blocks of Fibonacci lengths with Fibonacci proportions of as and bs. How can it get any “Fibonacci”er than that? Here’s how: Define a different infinite string using the same definition as the Fibonacci numbers themselves: write \(W_0=0\), \(W_1=1\), and after that, each string is formed by writing the previous two next to each other: \(W_n=W_{n-1}W_{n-2}\). The Ws continue like this:

0, 1, 10, 101, 10110, 10110101, 1011010110110, 101101011011010110101, …,

and in the limit they define some infinite string of 0s and 1s that, without a doubt, is as “Fibonacci”y as it gets. But wait; except for the first digit, this is exactly the same as our jump sequence with 0=a and 1=b!
- 1 0 1 1 0 1 0 1 1 0 1 1 0 1 0 1 1 0 1 0 1 1 0 1 1 0 1 0 1 1 0 1 1 ...
a b a b b a b a b b a b b a b a b b a b a b b a b b a b a b b a b b ...
This truly is the Fibonacci numbers reincarnated in a binary string.

A Golden Observation

Last week we saw that the best strategy for Wythoff’s game is to always move to one of the blue squares in the diagram below (if you can). We found the locations of the blue squares with an iterative algorithm that builds outward from (0,0), but we haven’t yet discovered the underlying pattern in how these blue cells are arranged. Let’s go pattern hunting!

As we noticed last week, the blue cells are arranged in a symmetric “V” shape, formed from two seemingly straight lines. What are the slopes of these lines? This is the question du jour.

Jumps in losing positions for Wythoff's game
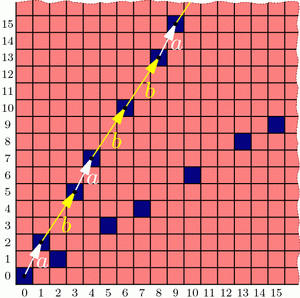
Jumps between blue cells for Wythoff's game come in just two sizes: a=(1,2) and b=(2,3).

Looking more carefully, the upper branch of the “V” has only two types of “gaps”: consecutive blue cells are separated by either a “short” (1,2) step (a.k.a. a knight’s move) or a “long” (2,3) step. So, if we believe that this “V” branch is a perfect line, then that line’s slope should be somewhere between the slopes of these two steps, namely \(3/2=1.5\) and \(2/1=2\). Knowing more about how these steps are arranged will tell us more about the “V”.

Specifically, label these “short” and “long” steps as a and b respectively. What we care about is the ratio of bs to as. Why? For example, if there were an equal number of as and bs on average, then the slope of the line would be the same as the vector \(a+b=(3,5)\), i.e., the slope would be 5/3. If there were, say, two bs for each a in the long run, then the line would fall in the direction of \(a+2b=(5,8)\), with slope 8/5. Unfortunately, the ratio we seek is neither 1 nor 2; what is this magic number?

Let’s write down the sequence of jumps along our line. From the diagram above we see that it starts a b a b b a …, and using last week’s iterative algorithm, we can compute farther into this infinite sequence:

a b a b b a b a b b a b b a b a b b a b a b b a b b a b a b b a b b …

This sequence seems to be composed of “blocks” of (a b) and (a b b):

(a b)(a b b)(a b)(a b b)(a b b)(a b)(a b b)(a b)(a b b)(a b b)(a b)(a b b)(a b b)…

So for every a there are either one or two bs, meaning the ratio of bs to as is somewhere between 1 and 2. So the slope should be between 5/3 and 8/5. But what is it exactly? To answer this, we need to know how these “short” and “long” blocks are arranged.

Write A = (a b) and B = (a b b), so we can rewrite the sequence of blocks as

A B A B B A B A B B A B B …

Hold on; this sequence looks familiar. It’s exactly the same pattern as our original jump sequence! So it seems that the pattern of blocks is exactly the same as the pattern of the letters themselves! This is a “self-generating” sequence!

In particular, if the ratio of bs to as is some number r, then the ratio of (a b b) blocks to (a b) blocks is also r. But if we have one block of (a b) and r blocks of (a b b) then we have a total of \(1+2r\) bs and \(1+r\) as, so the ratio of bs to as is \(\frac{1+2r}{1+r}=r\). This simplifies to \(1+r=r^2\), and the solution is the shiny number \(r=\frac{1+\sqrt{5}}{2}\), known as the golden ratio and denoted \(\phi\) (Greek letter phi).

Now we know that our purported line should be in the direction of \(a+b\cdot\phi = (1+2\phi,2+3\phi)\), so the slope is \((2+3\phi)/(1+2\phi)=\phi\). And since our “V” shape is symmetric, the other line should have slope \(1/\phi = \frac{\sqrt{5}-1}{2}\). Done and done!

Well, yes and no. We found the slopes of the lines in the “V”, but why do they form lines at all? And what does all this have to do with the Fibonacci numbers?

Wythoff’s Game: Red or Blue?

Let’s play a game; just the two of us. We’ll need a (potentially large!) chess board and a single queen somewhere on the board. We take turns making queen moves, always making progress toward the bottom-left corner of the board. Specifically, in one turn we are allowed to move the queen as far as we want either straight down, straight left, or diagonally down and left (at a 45-degree angle). The first to land the queen on the bottom-left corner wins the game. If you go first and we both play as best as possible, who wins? Well, it depends on where the queen started.

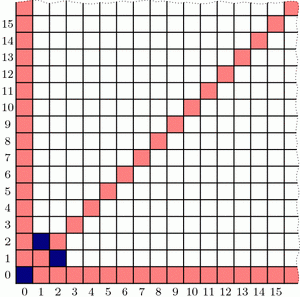
If the queen starts at any of the light-red spaces in the diagram below, you can win on the first move by going straight to the bottom-left corner. On the other hand, if the queen starts at (2,1), then you’re sunk: any move you make lands on a red square and so leaves me in a position to win. So (2,1) is a losing position, indicated by dark blue shading. (The jagged edge reminds us that we could ask the same questions on much bigger grids.)

Wythoff's game: beginning analysis
If the queen starts on a light-red cell, you win on the first move. If she starts on (1,2) or (2,1) (dark blue), you lose.

What should you do if the queen starts at, say, (6,5)? Move to (2,1)! This leaves me in a losing position, so no matter how I respond, you’ll win. So once we find where all the blue losing cells are, your strategy should be: always move to a blue cell, if you can. What if you can only land on red cells? Then you must have started at a blue position, and you’re going to lose.

This also tells us how to find the losing positions, step by step. We know that (2,1) and (1,2) are losing positions, so any position that can reach these in one move is a winning position. But now (3,5) and (5,3) can only reach red cells, so they are blue, and in turn, anything that can directly reach (3,5) or (5,3) is red.

Wythoff's game: continued analysis
Finding blue cells step by step. Left: Because (1,2) and (2,1) are blue, any cells that can reach these directly are red. Right: (3,5) and (5,3) can only reach red cells, so we color them blue. This reveals even more red cells.

Continuing like this, we can fill up our board as follows:

Wythoff's game: completed analysis
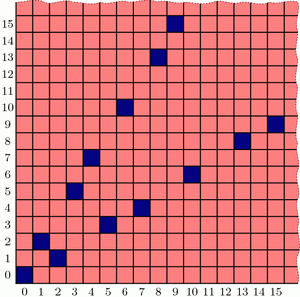
Continuing step-by-step as above, all blue cells in the grid are revealed. What patterns can we find?

Interestingly, the blue positions seem to fit nicely into two straight lines forming a “V”-shape, but the exact pattern governing their placement is less clear (especially if we were to ask about larger grids!). Is there more underlying structure in the blue cells’ positioning?[1] How could we discover the pattern in their placement? And why does that line seem to have slope equal to the golden ratio, \(\phi = (1+\sqrt{5})/2\)?[2] Tune in next week to find out! In the meantime, be sure to play a few rounds of Wythoff’s game with your friends!


Notes

  1. Yes. We call that a leading question… []
  2. Correction: that is a leading question. []

Dueling Dilettantes

[This is post #4 in a series on the Thue-Morse sequence. See posts #1, #2, and #3.]

What? You don’t agree that the Thue-Morse sequence is awesome? OK, there’s only one way to settle this dispute: I challenge you to a duel. This unfortunately might take a while, because we both have terrible aim.

Let’s say we both have the same probability \(p=.2\) of hitting our target on any given shot, and the first to hit is the winner. I’ll even be gracious and let you go first, and I’ll shoot second. In the first two shots of the game, the probability that you win (i.e., hit your first shot) is \(p=.2\), and the probability that I win (i.e., you miss and then I hit) is \((1-p)\cdot p = .16\). (In the remaining probability \(1-.2-.16=.64\), the duel continues.) This means that you are more likely to win during the first two shots than I am, so it should only be fair that I take the third shot!

How do the probabilities look in the first three shots? Your chances of winning are still \(p=.2\), while mine are \((1-p)\cdot p + (1-p)^2\cdot p = .288\) because I might win on the second or third shot. Now it seems that I have the advantage, so you should take the 4th shot in the interest of fairness. Let’s continue like this, choosing to give the 5th shot to the theoretical underdog from the first 4 rounds, the 6th shot to the underdog in the first 5 rounds, and so on.

You can (and should!) check that the shot order will be Y, M, M, Y, M, Y, Y, M, M, Y,  M, Y, Y, M, M, Y, ..., where Y=You and M=Me. Does that sequence look familiar? The first 10 digits look suspiciously like the start of the Thue-Morse sequence, but I don’t recognize the rest of it. Did we make a computation error? Hmm…

The problem, as it turns out, is that our aim is too good! What happens if we make ourselves worse by, say, standing farther apart? Let’s say we now have a \(p=.1\) chance of hitting our mark on each shot. What is the “fair” shot order this time? Our duel will now follow the sequence Y, M, M, Y, M, Y, Y, M, M, Y, Y, M, Y, M, M, Y, M, Y, Y, M,  M, Y, Y, ... which matches the Thue-Morse sequence in the first 20 digits. Similarly, setting \(p=.05\) gives 48 correct Thue-Morse digits, defining \(p=.01\) gives 192 correct Thue-Morse digits, and decreasing to \(p=.001\) gives 1536 matching digits! It can in fact be proved[1] that decreasing \(p\) toward 0 (i.e., making our aim worse) gives more and more Thue-Morse digits, with the full Thue-Morse sequence appearing in the limit.

See? Even when arguing about whether the Thue-Morse sequence is cool, we find evidence of its greatness! I hereby declare myself the winner of this duel.

This concludes our series on the Thue-Morse sequence. Tune in next week for, well, something else!


Notes

  1. Joshua Cooper and Aaron Dutle. Greedy Galois Games. ArXiv, 2011. []

Chess, Bored

[This is post #3 in a series on the Thue-Morse sequence, which was introduced two weeks ago and discussed further last week.]

While the Thue-Morse sequence appears in many branches of Mathematics[1], this sequence has also captured a place in the history of chess.

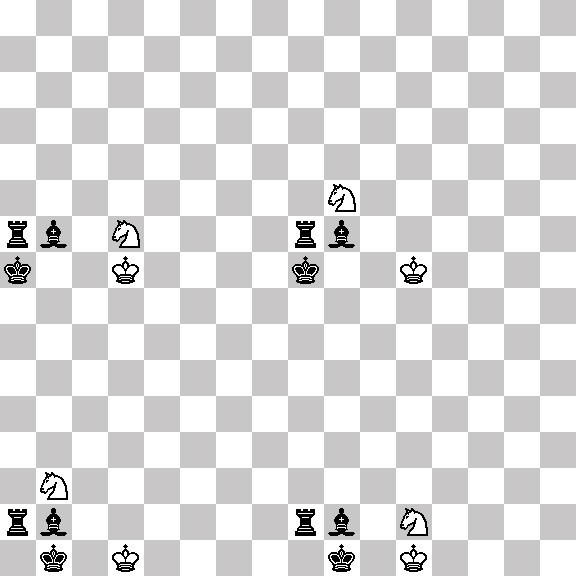
With only the basic rules of chess (specifically, how pieces move and capture and how a game may end by checkmate or stalemate), there is no guarantee that a game of chess will ever finish. For example, two (very bored!) players could theoretically move their knights back and forth ad infinitum without ever engaging each other or capturing a piece (but why would they want to?). A more realistic example is drawn below. In this game, black will soon checkmate white if given the freedom to move, and white has no way to win. However, white can avoid losing by keeping black in an unending runaround with repeated checks, as illustrated. In this case (a phenomenon known as perpetual check), forcing an infinite game is more advantageous for white than allowing an otherwise inevitable loss.

Perpetual Check
Animation frames were made with the WiseBoard Chess Board Editor.

Because of this possibility of never finishing, a search began for new chess rules to guarantee that every game of chess eventually ends. One suggested rule was:

A chess game ends with a draw if a sequence of moves—with all pieces in exactly the same positions—is played three times successively.[2]

The hope was that any sufficiently long chess game would eventually repeat itself enough to break this rule. However, as Mathematician and Chess Grandmaster Max Euwe showed in 1929[3], this hope is not correct. Indeed, there exist infinite chess games that never repeat the same block of moves three times in a row!

How did he prove this? With the Thue-Morse Sequence, of course! He proved the very unintuitive fact that the Thue-Morse sequence has no chunk repeated three times consecutively. Such a thrice-repeated sequence is called a cube, so this property can be restated by saying that the Thue-Morse sequence is cube-free. For example, you will never find the sequences 1 1 1 or 011 011 011 in the Thue-Morse sequence. (Challenge: show that these two sequences do not appear. Harder challenge: show that the Thue-Morse sequence is cube free!) So, if the “very bored” knight-flippers described above decide to move their right knights or left knights according to the 1s and 0s of the Thue-Morse sequence, the resulting game will have no tripled move sequences.

Luckily, the above rule is not part of the current official chess rule set. There are now two rules on the books that can be used to eventually end any chess game. (In fact, either one would suffice. [Prove this!]) A draw may be declared in either of these situations:

  • The exact same board position appears three times ever during a game. (Every detail must be the same, such as whose turn it is, which kings have the ability to castle, etc.)
  • No pawn is moved and no piece is captured in 50 consecutive turns. (A turn consists of one move by each player.)

However, there’s (always) a catch. These two rules only take effect if a player notices and decides to declare a draw. So even with all modern rules in effect, the bored knight-flippers are still allowed to play their infinite game of chess—cube-free or not.


Notes

  1. A great survey called The ubiquitous Prouhet-Thue-Morse sequence by Allouche and Shallit documents many sightings of this sequence throughout Mathematics, including Combinatorics, Differential Geometry, Number Theory, Analysis, and as discussed here, Combinatorial Game Theory. []
  2. Manfred Börgens, Max Euwe’s sequence []
  3. in his paper titled Mengentheoretische Betrachtungen über das Schachspiel []