Wythoff’s Formula

Welcome back! I took a few-weeks’ blogging hiatus to focus on end-of-term craziness, but I am now resuming a regular(ish) weekly schedule throughout the summer. Let’s get back to Wythoff’s game!

Here’s a brief recap: In trying to solve for optimal play in Wythoff’s game, we saw how to algorithmically find the blue “losing positions”; we observed that these seemed to lie on two lines and, assuming this fact, we computed the lines’ slopes to be \(\phi\) and \(1/\phi\); and we saw how the Fibonacci numbers were hiding all over the place. But one question lingers: why lines? We’ll answer this today.

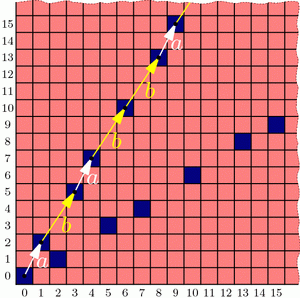
Two posts ago, we saw that if we take all of the (infinitely many) steps in the upper “V” branch and average them together, the result has slope \(\phi\). In fact, with a little more work we can compute this “average step” exactly, not just its slope: it is the vector \(v=(\phi,\phi^2)\).[1] Let’s compare these average steps, namely v, 2v, 3v, etc., with the actual ones:

Overlaying average steps on Wythoff's grid
Drawing a dot at each mutliple of the "average" step v reveals a perfect correspondence between dots and blue cells.

The dots and blue squares are perfectly matched! It seems that this may provide a precise way to easily locate all the blue cells in the upper “V” branch at once! And since the whole diagram is symmetric through the line \(y=x\), the lower “V” branch should be governed by vector \(w=(\phi^2,\phi)\) in the same way. Thus, a hypothesis forms:

Conjecture: The losing cells in Wythoff’s game are exactly those that contain an integer multiple of vector \(v=(\phi,\phi^2)\) or vector \(w=(\phi^2,\phi)\).

If we use the notation \(\lfloor x\rfloor\) for the floor function that rounds x down to the nearest integer[2], then this conjecture says that the nth blue cells on the upper and lower “V” branches have coordinates \((\lfloor n\cdot\phi\rfloor, \lfloor n\cdot\phi^2\rfloor)\) and \((\lfloor n\cdot\phi^2\rfloor, \lfloor n\cdot\phi\rfloor)\) respectively. (When \(n=0\), both formulas give (0,0).)

As we will see, this conjecture is indeed correct. How could we rigorously prove this fact?

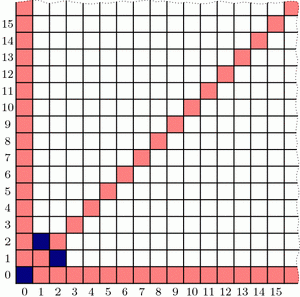
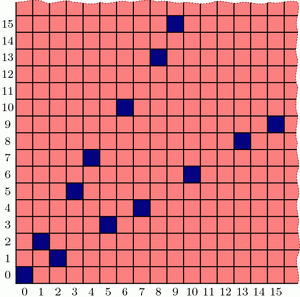
To start, in a new grid, let’s color green all cells that fit our hypothesized formula, i.e., contain a multiple of v or w. Fill the rest of the cells with yellow. We now have two separate, a priori unrelated colorings of the grid: one with red/blue according to Wythoff’s game, and another with yellow/green according to vectors v and w.

Comparing Wythoff grid colorings
Two colorings of Wythoff's grid that we conjecture are identical. Left: the losing positions (dark blue) found previously by an iterative, optimal-play strategy. Right: multiples of vectors v and w (dotted) and their containing cells (dark green).

Proving the conjecture amounts to showing that these colorings are the same. We’ll accomplish this by showing that the yellow/green coloring behaves just like the red/blue one:

  • Endgame condition: The cell (0,0) is green.
  • Yellows win: From any yellow cell, it is possible to move to a green cell with one Wythoff’s game move.
  • Greens lose: From a green cell, there are no other green cells accessible with a single Wythoff’s game move.

We have already observed these three properties for the red/blue coloring, and we saw that they uniquely determined the red and blue cell positions. If we could show the yellow/green coloring follows the same pattern, we could conclude that the colorings are indeed identical. So we just need to check that our yellow/green formula satisfies these three conditions!

Now that we have set the stage to dig into the meat of this proof, it is time to bid farewell until next week. See you then!


Notes

  1. Indeed, since we know that a=(1,2) and b=(2,3) appear in proportion 1 to \(\phi\), the average step is \(\frac{1}{1+\phi}a+\frac{\phi}{1+\phi}b = (\phi,\phi^2)\). This can also be computed from the Fibonacci observations in the most recent post. []
  2. For example, \(\lfloor 2.718\rfloor = 2\), \(\lfloor 5\rfloor = 5\), and \(\lfloor -3.14\rfloor = -4\). []

The “Fibonacci”est String

The celebrated Fibonacci Sequence is defined by setting each term equal to the sum of the two previous terms, starting at \(F_0=0\) and \(F_1=1\). So it continues like this:

0, 1, 1, 2, 3, 5, 8, 13, 21, 34, 55, 89, 144, 233, 377, …

What’s the relation to last week‘s infinite jump sequence,

a b a b b a b a b b a b b a b a b b a b a b b a b b a b a b b a b b … ?

Let’s find out!

Recall from last week that we can group our sequence into blocks of \(A=(ab)\) and \(B=(abb)\), and that the pattern of “short” and “long” blocks is the same as the pattern of as and bs in the original sequence:

Grouping the Jump Sequence, Level 1 This means we can do this grouping again! Specifically, we can group our sequence into “blocks of blocks”, or level 2 blocks, that look like \(A_2=[(ab)(abb)]\) and \(B_2=[(ab)(abb)(abb)]\):

Grouping the Jump Sequence, Level 2 Furthermore, the pattern of short and long level 2 blocks is still the same as the original jump sequence! So we can keep going, grouping our sequence into level 3 blocks \(A_3=A_2 B_2\) and \(B_3=A_2 B_2 B_2\), level 4 blocks \(A_4=A_3 B_3\) and \(B_4=A_3 B_3 B_3\), and so on, thus finding longer and longer patterns that fill up our sequence. Here’s level 3:

Grouping the Jump Sequence, Level 3 One natural question is: what are the lengths of these blocks? Let’s make a table:

n An Bn An Length Bn Length
0 a b 1 1
1 ab abb 2 3
2 ababb ababbabb 5 8
3 ababbababbabb ababbababbabbababbabb 13 21

The lengths are exactly the Fibonacci numbers! (Prove this!) Furthermore, how many as and bs does each block have? Here’s another table:

n An # of as # of bs Bn # of as # of bs
0 a 1 0 b 0 1
1 ab 1 1 abb 1 2
2 ababb 2 3 ababbabb 3 5
3 ababbababbabb 5 8 ababbababbabbababbabb 8 13

Again the Fibonacci numbers! This gives us another way to compute the ratio of as to bs in the jump sequence: The ratios of bs to as in blocks An and Bn are \(F_{2n}/F_{2n-1}\) and \(F_{2n+1}/F_{2n}\) respectively, so as n gets larger these ratios should both approach last week’s answer, the golden ratio \(\phi\).

OK, so our jump sequence is very “Fibonacci”y: it has blocks of Fibonacci lengths with Fibonacci proportions of as and bs. How can it get any “Fibonacci”er than that? Here’s how: Define a different infinite string using the same definition as the Fibonacci numbers themselves: write \(W_0=0\), \(W_1=1\), and after that, each string is formed by writing the previous two next to each other: \(W_n=W_{n-1}W_{n-2}\). The Ws continue like this:

0, 1, 10, 101, 10110, 10110101, 1011010110110, 101101011011010110101, …,

and in the limit they define some infinite string of 0s and 1s that, without a doubt, is as “Fibonacci”y as it gets. But wait; except for the first digit, this is exactly the same as our jump sequence with 0=a and 1=b!
- 1 0 1 1 0 1 0 1 1 0 1 1 0 1 0 1 1 0 1 0 1 1 0 1 1 0 1 0 1 1 0 1 1 ...
a b a b b a b a b b a b b a b a b b a b a b b a b b a b a b b a b b ...
This truly is the Fibonacci numbers reincarnated in a binary string.

A Golden Observation

Last week we saw that the best strategy for Wythoff’s game is to always move to one of the blue squares in the diagram below (if you can). We found the locations of the blue squares with an iterative algorithm that builds outward from (0,0), but we haven’t yet discovered the underlying pattern in how these blue cells are arranged. Let’s go pattern hunting!

As we noticed last week, the blue cells are arranged in a symmetric “V” shape, formed from two seemingly straight lines. What are the slopes of these lines? This is the question du jour.

Jumps in losing positions for Wythoff's game
Jumps between blue cells for Wythoff's game come in just two sizes: a=(1,2) and b=(2,3).

Looking more carefully, the upper branch of the “V” has only two types of “gaps”: consecutive blue cells are separated by either a “short” (1,2) step (a.k.a. a knight’s move) or a “long” (2,3) step. So, if we believe that this “V” branch is a perfect line, then that line’s slope should be somewhere between the slopes of these two steps, namely \(3/2=1.5\) and \(2/1=2\). Knowing more about how these steps are arranged will tell us more about the “V”.

Specifically, label these “short” and “long” steps as a and b respectively. What we care about is the ratio of bs to as. Why? For example, if there were an equal number of as and bs on average, then the slope of the line would be the same as the vector \(a+b=(3,5)\), i.e., the slope would be 5/3. If there were, say, two bs for each a in the long run, then the line would fall in the direction of \(a+2b=(5,8)\), with slope 8/5. Unfortunately, the ratio we seek is neither 1 nor 2; what is this magic number?

Let’s write down the sequence of jumps along our line. From the diagram above we see that it starts a b a b b a …, and using last week’s iterative algorithm, we can compute farther into this infinite sequence:

a b a b b a b a b b a b b a b a b b a b a b b a b b a b a b b a b b …

This sequence seems to be composed of “blocks” of (a b) and (a b b):

(a b)(a b b)(a b)(a b b)(a b b)(a b)(a b b)(a b)(a b b)(a b b)(a b)(a b b)(a b b)…

So for every a there are either one or two bs, meaning the ratio of bs to as is somewhere between 1 and 2. So the slope should be between 5/3 and 8/5. But what is it exactly? To answer this, we need to know how these “short” and “long” blocks are arranged.

Write A = (a b) and B = (a b b), so we can rewrite the sequence of blocks as

A B A B B A B A B B A B B …

Hold on; this sequence looks familiar. It’s exactly the same pattern as our original jump sequence! So it seems that the pattern of blocks is exactly the same as the pattern of the letters themselves! This is a “self-generating” sequence!

In particular, if the ratio of bs to as is some number r, then the ratio of (a b b) blocks to (a b) blocks is also r. But if we have one block of (a b) and r blocks of (a b b) then we have a total of \(1+2r\) bs and \(1+r\) as, so the ratio of bs to as is \(\frac{1+2r}{1+r}=r\). This simplifies to \(1+r=r^2\), and the solution is the shiny number \(r=\frac{1+\sqrt{5}}{2}\), known as the golden ratio and denoted \(\phi\) (Greek letter phi).

Now we know that our purported line should be in the direction of \(a+b\cdot\phi = (1+2\phi,2+3\phi)\), so the slope is \((2+3\phi)/(1+2\phi)=\phi\). And since our “V” shape is symmetric, the other line should have slope \(1/\phi = \frac{\sqrt{5}-1}{2}\). Done and done!

Well, yes and no. We found the slopes of the lines in the “V”, but why do they form lines at all? And what does all this have to do with the Fibonacci numbers?

Wythoff’s Game: Red or Blue?

Let’s play a game; just the two of us. We’ll need a (potentially large!) chess board and a single queen somewhere on the board. We take turns making queen moves, always making progress toward the bottom-left corner of the board. Specifically, in one turn we are allowed to move the queen as far as we want either straight down, straight left, or diagonally down and left (at a 45-degree angle). The first to land the queen on the bottom-left corner wins the game. If you go first and we both play as best as possible, who wins? Well, it depends on where the queen started.

If the queen starts at any of the light-red spaces in the diagram below, you can win on the first move by going straight to the bottom-left corner. On the other hand, if the queen starts at (2,1), then you’re sunk: any move you make lands on a red square and so leaves me in a position to win. So (2,1) is a losing position, indicated by dark blue shading. (The jagged edge reminds us that we could ask the same questions on much bigger grids.)

Wythoff's game: beginning analysis
If the queen starts on a light-red cell, you win on the first move. If she starts on (1,2) or (2,1) (dark blue), you lose.

What should you do if the queen starts at, say, (6,5)? Move to (2,1)! This leaves me in a losing position, so no matter how I respond, you’ll win. So once we find where all the blue losing cells are, your strategy should be: always move to a blue cell, if you can. What if you can only land on red cells? Then you must have started at a blue position, and you’re going to lose.

This also tells us how to find the losing positions, step by step. We know that (2,1) and (1,2) are losing positions, so any position that can reach these in one move is a winning position. But now (3,5) and (5,3) can only reach red cells, so they are blue, and in turn, anything that can directly reach (3,5) or (5,3) is red.

Wythoff's game: continued analysis
Finding blue cells step by step. Left: Because (1,2) and (2,1) are blue, any cells that can reach these directly are red. Right: (3,5) and (5,3) can only reach red cells, so we color them blue. This reveals even more red cells.

Continuing like this, we can fill up our board as follows:

Wythoff's game: completed analysis
Continuing step-by-step as above, all blue cells in the grid are revealed. What patterns can we find?

Interestingly, the blue positions seem to fit nicely into two straight lines forming a “V”-shape, but the exact pattern governing their placement is less clear (especially if we were to ask about larger grids!). Is there more underlying structure in the blue cells’ positioning?[1] How could we discover the pattern in their placement? And why does that line seem to have slope equal to the golden ratio, \(\phi = (1+\sqrt{5})/2\)?[2] Tune in next week to find out! In the meantime, be sure to play a few rounds of Wythoff’s game with your friends!


Notes

  1. Yes. We call that a leading question… []
  2. Correction: that is a leading question. []

Three-Cornered Deltoids

[This is the third and final post in this series on triangle geometry. See the previous posts on Morley’s theorem and the 9-point circle.]

For our final exploration in this series, let’s again begin with our triangle ABC and a point P on the circumcircle of the triangle, i.e., the circle through the three vertices. If we drop P directly onto the three lines of the triangle at right angles[1], then by coincidence, these three points lie on a single line, called the Simson line of point P.

The Simson line of point P in triangle ABC

Just for fun, let’s draw point Q diametrically opposite from P on the circumcircle, and let’s also look at Q‘s Simson line. How do these two Simson lines interact? Somewhat surprisingly, these lines intersect at right angles. The phenomenal part is that this point of intersection lies on the 9-point circle!

Two opposite Simson lines

Furthermore, as P and Q move around the circumcircle, the intersection of their Simson lines moves around the 9-point circle at twice the speed and in the opposite direction:

Simson lines tracing the 9-point circle

This story gets even more unbelievable when we look at how the Simson lines move in this animation. As it turns out, the Simson lines trace a curve in the shape of a deltoid, which is like an equilateral triangle with curved sides[2]. The deltoid traced here is called Steiner’s deltoid.

Simson lines trace the Steiner deltoid

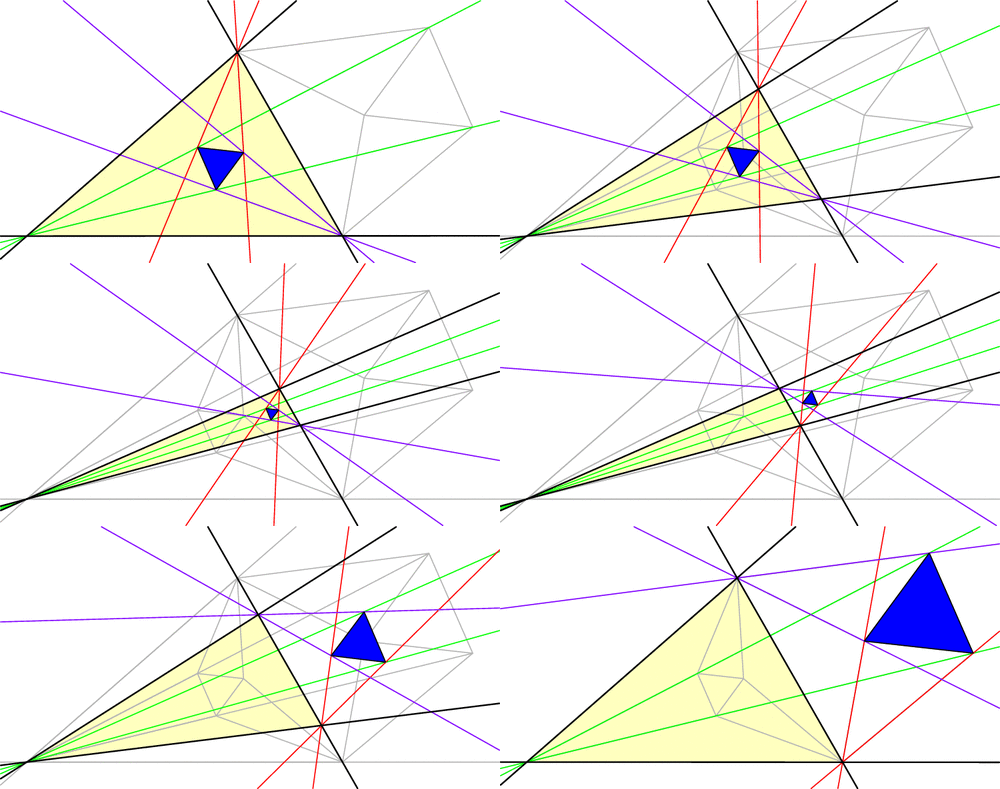
And finally, here’s an incredible fact that ties everything together: If we draw the equilateral triangle around this deltoid, then the edges are parallel to the edges of the equilateral Morley triangle(s).

Steiner deltoid and Morley triangle

Holy Morley!


Notes

  1. Note that we may have to extend the lines beyond the triangle. []
  2. Specifically, a deltoid is the shape that results when you roll a circle inside a circle three-times larger and trace the path of a single point. See Wikipedia:Deltoid_curve for more information. []

Several Sneaky Circles

In last week’s exploration we uncovered many equilateral triangles hiding in a general triangle ABC. This week we’ll find circles.

Draw any triangle ABC. The line AHA perpendicular to BC is called the altitude though A, with HA at the foot of the altitude. (See the image below.) It can be shown that the three altitudes AHA, BHB, and CHC meet at a single point, H, called the orthocenter of triangle ABC.

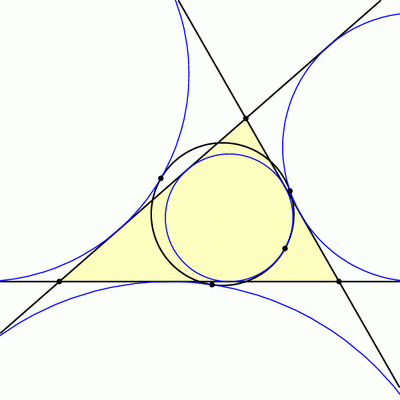
Now, let’s put dots at a few important points on our triangle: First, dot the three altitude feet, HA, HB, and HC. Next, dot the midpoints of the sides of the triangle, which we’ll call MA, MB, and MC. Finally, dot the Euler points EA, EB, and EC, which are halfway between H (the orthocenter) and the vertices of our triangle. Today’s first miracle is that all nine of these dots lie on a single circle, aptly named the 9-point circle:

The 9-point circle
The 9-point circle of a triangle is the circle that miraculously passes through the triangle's altitude feet, edge midpoints, and Euler points.

Recall that it only takes three points to determine a circle, so nine on a single circle is very far from coincidence!

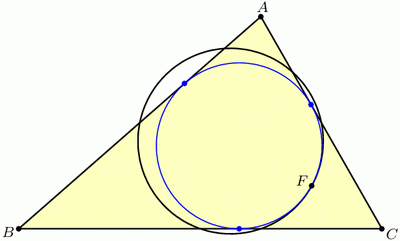
Another way to coax a circle out of triangle ABC is to “inscribe” one in the triangle by drawing a circle tangent to the three sides. This circle is called the incircle. Our second miracle is that the incircle and the 9-point circle, which were constructed in very different ways, nevertheless play nicely together: they are tangent! The point where they touch is known as the Feuerbach point of triangle ABC, named after Karl Feuerbach who discovered and proved this difficult fact in 1822.

The Feuerbach point
The 9-point circle and the incircle are miraculously tangent at the Feuerbach point.

But there are three other circles that, like the incircle, are tangent to all three lines of the triangle. These “exscribed” circles are called the excircles of triangle ABC, and as luck (or extraversions[1]) would have it, these are also tangent to the 9-point circle:

Tangencies of the 9-point circle with the incircle and excircles
The 9-point circle is also tangent to the excircles.

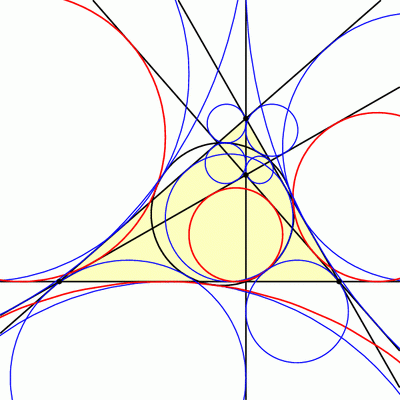
But wait, there’s more! It turns out that triangles ABC and HBC have the same 9-point circle, and so if we look at the incircle and excircles of triangle HBC, these will also be tangent to our 9-point circle. The same is true for triangles HCA and HAB, so we have found 16 circles all tangent to the nine-point circle!

16 tangencies with the 9-point circle
The 9-point circle is tangent to the incircle and excircles of triangles ABC, HBC, HCA, and HAB. These four circles for triangle HBC are shown in thick red.

Notes

  1. Recall that we used extraversions last week to go from one Morley triangle to another. Here, extraversions interchange the incircle and excircles. []

Many Morley Triangles

Given my blog title, how have I gone this long without discussing triangle geometry? I will rectify this gross negligence in the next few weeks. Let’s begin with a seemingly impossible fact due to Frank Morley.

Start with a triangle ABC, with any shape you wish. Now cut its angles into three equal parts, and extend these angle trisectors until they meet in pairs as illustrated below, forming triangle PQR. Morley’s amazing theorem says that this Morley triangle, PQR, will always be equilateral!

Morley's theorem

Why would this be true? Well, Morley’s theorem tells us that this diagram has three nice 60-degree angles in the middle, but we may suspect that, in fact, all of the angles are nice! This key insight lets us piece together the following argument, where we build up the diagram backwards from its constituent pieces. Draw seven separate “puzzle piece” triangles with angles and side-lengths as shown below, where the original triangle ABC has angles \(3\alpha,3\beta,3\gamma\) respectively. (Be sure to check that puzzle pieces with these specifications actually exist! Hint: use the Law of Sines.)

Proof of Morley's theorem
Triangle ABC is built out of seven "puzzle pieces" with angles and side-lengths as specified here. In this diagram, \(\alpha^\prime=\alpha+60\) and \(\alpha^{\prime\prime}=\alpha+120\), and similarly for \(\beta\) and \(\gamma\).

Now, fit the pieces together: all matching edge-lengths are equal (by design), and the angles around vertex P add up to \(60+(\gamma+60)+(\alpha+120)+(\beta+60)=360\) and similarly for Q and R, so the puzzle fits together into a triangle similar to our original triangle ABC. But now these pieces must make up the Morley configuration, and since we started with an equilateral in the middle, we’re done with the proof![1]

But there’s more to the Morley story. Let’s push A and C to make them swap positions, dragging the trisectors and Morley triangle along for the ride (a process known as extraversion). We end up using some external angle trisectors instead of only internal ones, but the Morley triangle remains equilateral throughout. This gives us a new equilateral Morley triangle for our original ABC!

New Morley triangles through extraversion

In fact, each vertex of ABC has six angle trisectors (three pairs of two), and if you continue applying extraversions you’ll soon uncover that our original triangle ABC has 18 equilateral Morley triangles arranged in a stunning configuration! (Click for larger image.)

All 18 Morley triangles

Here’s a challenge: the diagram above has 27 equilateral triangles, but only 18 of them are Morley triangles (i.e., are made from a pair of trisectors from each vertex). Which ones are they?


Notes

  1. This is a slight modification of a proof by Conway and Doyle. []

Logic Under Construction

In last week’s discussion of proofs by contradiction and nonconstructive proofs, we showed:

Theorem: There exist irrational numbers \(x\) and \(y\) with the property that \(x^y\) is rational.

However, our proof was nonconstructive: it did not pinpoint explicit values for \(x\) and \(y\) that satisfy the condition, instead proving only that such numbers must exist. Would a more constructive proof be more satisfying? Let’s see! I claim \(x=\sqrt{2}\) and \(y=\log_2 9\) work, because \(\sqrt{2}\) we already know to be irrational, \(y=\log_2 9\) can be similarly proved to be irrational (try this!), and $$x^y = \sqrt{2}^{\log_2 9} = \sqrt{2}^{\log_{\sqrt{2}}3}=3,$$ which is rational.

Let’s further discuss why last week’s proof was less satisfying. The following rephrasing of this proof may help shed some light on the situation:

Proof: Assume the theorem were false, so that any time \(x\) and \(y\) were irrational, \(x^y\) would also be irrational. This would imply that \(\sqrt{2}^{\sqrt{2}}\) would be irrational, and by applying our assumption again, \(\left(\sqrt{2}^{\sqrt{2}}\right)^{\sqrt{2}}\) would also be irrational. But this last number equals 2, which is rational. This contradiction disproves our assumption and thereby proves the theorem, QED.

So perhaps this argument seems less satisfactory simply because it is, at its core, a proof by contradiction. It does not give us evidence for the positive statement “\(x\) and \(y\) exist”, but instead only for the negative statement “\(x\) and \(y\) don’t not exist.” (Note the double negative.) This distinction is subtle, but a similar phenomenon can be found in the English language: the double negative “not bad” does not mean “good” but instead occupies a hazy middle-ground between the two extremes. And even though we don’t usually think of such a middle-ground existing between logic’s “true” and “false”, proofs by contradiction fit naturally into this haze. In fact, these ideas motivate a whole branch of mathematical logic called Constructive logic that disallows double negatives and proofs by contradiction, instead requiring concrete, constructive justifications for all statements.

But wait; last week’s proof that \(\sqrt{2}\) is irrational used contradiction, and therefore is not acceptable in constructive logic. Can we prove this statement constructively? We must show that \(\sqrt{2}\) is not equal to any rational number; what does it even mean to do this constructively? First, we turn it into a positive statement: we must show that \(\sqrt{2}\) is unequal to every rational number. And how do we constructively prove that two numbers are unequal? By showing that they are measurably far apart. So, here is a sketch of a constructive proof: \(\sqrt{2}\) is unequal to every rational number \(a/b\) because $$\left|\sqrt{2} – \frac{a}{b}\right| \ge \frac{1}{3b^2}.$$ See if you can verify this inequality![1]

PS. In case you are still wondering whether \(\sqrt{2}^{\sqrt{2}}\) is rational or irrational: It is irrational (moreover, transcendental), but the only proof that I know uses a very difficult theorem of Gelfond and Schneider.


Notes

  1. This inequality would also have to be proven in a constructive manner. See these Wikipedia articles for more information: Intuitionistic logic (another name for Constructive logic) and Square root of 2: Constructive proof. []

Methods of Irrationality

Being a mathematician requires you to think in strange ways.

For starters, you might think that mathematicians spend all day pondering purely theoretical things that only exist in Mathematical abstraction, right? Well, it can get even stranger than that: sometimes we have to think about things that don’t exist, even in the abstraction! It’s called a proof by contradiction, and here’s an example:

Theorem: The number \(\sqrt{2}\) is irrational.

Proof: To prove that \(\sqrt{2}\) is irrational, we have to show that we can never write it as a ratio of integers, \(\sqrt{2}=a/b\). So let’s assume we can find such a fraction and see where it leads us.

Let’s cancel common factors in the numerator and denominator so that \(a/b\) is in lowest terms. Squaring our equation shows that \(a^2=2b^2\), so \(a^2\) is even and so \(a\) itself is even. Since \(a/b\) is in lowest terms, \(b\) must be odd.

Since \(a\) is even, \(a^2\) is in fact divisible by 4. On the other hand, since \(b\) is odd, \(2b^2\) is not divisible by 4. But then the integer \(a^2=2b^2\) is both divisible by 4 and not divisible by 4, which is absurd! The only explanation for this contradiction is that our original assumption—that \(\sqrt{2}\) is rational—is false. So we’re done with the proof! Notice that we spent most of our effort reasoning about integers that never existed (specifically \(a\) and \(b\)).

But that’s not the only twisted thing about Mathematical thinking. Here’s a delightfully short yet aggravatingly unsatisfying proof:

Theorem: There exist irrational numbers \(x\) and \(y\) such that \(x^y\) is rational.

Proof: We already know that \(\sqrt{2}\) is irrational, so maybe we can use \(\sqrt{2}^{\sqrt{2}}\). Is this number rational? If it is, then we’re done: \(x=\sqrt{2},y=\sqrt{2}\) solves the problem. But what if \(\sqrt{2}^{\sqrt{2}}\) is irrational? In this case, I claim \(x=\sqrt{2}^{\sqrt{2}},y=\sqrt{2}\) works: indeed, $$\left(\sqrt{2}^{\sqrt{2}}\right)^{\sqrt{2}} = \sqrt{2}^{\sqrt{2} \cdot\sqrt{2}} = \sqrt{2}^2 = 2,$$ which is rational. In either case the required numbers \(x\) and \(y\) exist, so this completes the proof.

But wait; which is it? The proof shows us that one of the pairs \(x=\sqrt{2},y=\sqrt{2}\) or \(x=\sqrt{2}^{\sqrt{2}},y=\sqrt{2}\) works, but it doesn’t tell us which one! So, have we proven the theorem? Yes, technically, but only nonconstructively.

Frustrating, isn’t it?

Seeing Stars

Let us now take a closer look at the hex-fractal we sliced last week. Chopping a level 0, 1, 2, and 3 Menger sponge through our slanted plane gives the following:

Slicing various levels of the Menger sponge
Studying the slicings of various Menger sponge levels gives an algorithm for describing the hex-fractal.

This suggests an iterative recipe to generate the hex-fractal. Any time we see a hexagon, chop it into six smaller hexagons and six triangles as illustrated below. Similarly, any time we see a triangle, chop it into a hexagon and three triangles like this:

Hex-fractal Recipe
A recipe for constructing the hex-fractal: replace each hexagon with 6 hexagons and 6 triangles, and replace each triangle with 1 hexagon and 3 triangles.

In the limit, each triangle and hexagon in the above image becomes a hex-fractal or a tri-fractal, respectively. The final hex-fractal looks something like this (click for larger image):

hex-fractal

Now we are in a position to answer last week’s question: how can we compute the Hausdorff dimension of the hex-fractal? Let d be its dimension. Like last week, our computation will proceed by trying to compute the “d-dimensional volume” of our shape. So, start with a “large” hex-fractal and tri-fractal, each of side-length 1, and let their d-dimensional volumes be h and t respectively.[1]

Break these into “small” hex-fractals and tri-fractals of side-length 1/3, so these have volumes \(h/3^d\) and \(t/3^d\) respectively (this is how “d-dimenional stuff” scales). Since $$\begin{gather*}(\text{large hex}) = 6(\text{small hex})+6(\text{small tri}) \quad \text{and}\\ (\text{large tri}) = (\text{small hex})+3(\text{small tri}),\end{gather*}$$ we find that \(h=6h/3^d + 6t/3^d\) and \(t=h/3^d+3t/3^d\). Surprisingly, this is enough information to solve for the value of \(3^d\).[2] We find \(3^d = \frac{1}{2}(9+\sqrt{33})\), so $$d=\log_3\left(\frac{9+\sqrt{33}}{2}\right) = 1.8184\ldots,$$ as claimed last week.

As a final thought, why did we choose to slice the Menger sponge on this plane? Why not any of the (infinitely many) others? Even if we only look at planes parallel to our chosen plane, a mesmerizing pattern emerges:

Building a Menger sponge by diagonal slices

More Information

It takes a bit more work to turn the above computation of the hex-fractal’s dimension into a full proof, but there are a few ways to do it. Possible methods include mass distributions[3] or similarity graphs[4].

This diagonal slice through the Menger sponge has been proposed as an exhibit at the Museum of Math. Sebastien Perez Duarte seems to have been the first to slice a Menger sponge in this way (see his rendering), and his animated cross section inspired my animation above.

Thanks for reading!


Notes

  1. We’re assuming that the hex-fractal and tri-fractal have the same Hausdorff dimension. This is true, and it follows from the fact that a scaled version of each lives inside the other. []
  2. There are actually two solutions, but the fact that h and t are both positive rules one out. []
  3. Proposition 4.9 in: Kenneth Falconer. Fractal Geometry: Mathematical Foundations and Applications. John Wiley & Sons: New York, 1990. []
  4. Section 6.6 in: Gerald Edgar. Measure, Topology, and Fractal Geometry (Second Edition). Springer: 2008. []