Tag Archives: grids

Putting the Why in Wythoff

Last week we drew dots at multiples of the vectors \(v=(\phi,\phi^2)\) and \(w=(\phi^2,\phi)\), and we colored grid-cells green or yellow according to whether they contain a dot or not. Our remaining task was to prove these three facts:

  • Endgame condition: The cell (0,0) is green.
  • Greens lose: From a green cell, there are no other green cells accessible with a single Wythoff’s game move.
  • Yellows win: From any yellow cell, it is possible to move to a green cell with one Wythoff’s game move.
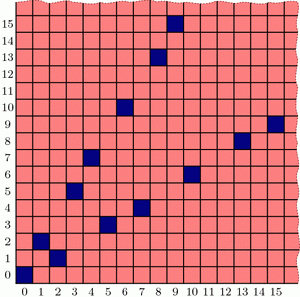
Our guess at the solution to Wythoff's game
Our guess at the solution to Wythoff's game: multiples of vectors v and w (dotted) and their containing cells (dark green).

The “Endgame” condition is easy: the dot at \(0\cdot v = (0,0)\) makes cell (0,0) green. One condition down, two to go!

The “Greens lose” condition asks us to show that no two green cells are in the same row, column, or (slope 1) diagonal—otherwise, you could get from one to the other with a Wythoff move. In fact, we will prove something stronger:

Covering Theorem: Every row, column, and diagonal contains exactly one green cell.

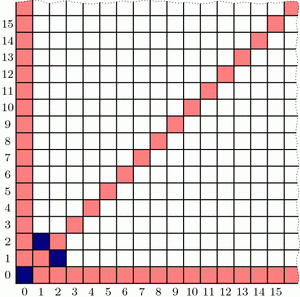
Pictorially, this says that each thick line in the diagrams below will hit one and only one green cell:

Covering the columns and diagonals
All columns (left), diagonals (right), and rows (not pictured) contain exactly one green cell. (Some of these green cells are beyond the image boundaries.) Because the green cell locations are symmetric through the line y=x, the diagram for the rows is redundant and therefore omitted.

It is not difficult to describe why each diagonal is covered, i.e. has exactly one green cell. In the diagram on the right, the central diagonal line has equation \(y-x=0\); the one above it has equation \(y-x=1\); the next is \(y-x=2\); and so on. And because \(\phi^2-\phi=1\), the vector v jumps from one diagonal line to the next at each step. Vector w similarly jumps from line to line in the other direction.

By contrast, I find the fact that each column is covered quite surprising. It says that the upper and lower branches of the “V” perfectly complement each other, each filling exactly the columns that the other skips! Before we prove this fact, let’s see why it helps us.

If we assume the covering theorem for now, we can finish the three conditions needed for our proof. We already saw that (0,0) is green, and the covering theorem certainly tells us that each row, column, and diagonal has at most one green cell, so the “Greens lose” condition holds. We just have to prove the “Yellows win” property: that you can always move to a green cell from any yellow cell. The idea is simple: if your yellow cell is above the “V”[1] then move down to the unique green cell in your column (which may be on either the upper or lower “V” branch). If you are below the “V”, move left to the green cell in your row. Finally, if you are inside the “V”, move diagonally. In this way, you can always move to a green cell with one Wythoff move.

Proving the "Yellows win" condition
All yellow cells can reach a green cell with one Wythoff move. Yellow cells above the "V" can move down to a green cell; yellow cells below the "V" can move left to a green cell; yellow cells inside the "V" can move diagonally to a green cell.

With this third and last property verified, we’re finally done with our proof! …except that we still need to prove the mysterious covering theorem. We’ll discuss this next week. Come back then for the exciting QED!


Notes

  1. i.e., its lower-left corner is above the line \(y=\phi\cdot x\) []

Wythoff’s Formula

Welcome back! I took a few-weeks’ blogging hiatus to focus on end-of-term craziness, but I am now resuming a regular(ish) weekly schedule throughout the summer. Let’s get back to Wythoff’s game!

Here’s a brief recap: In trying to solve for optimal play in Wythoff’s game, we saw how to algorithmically find the blue “losing positions”; we observed that these seemed to lie on two lines and, assuming this fact, we computed the lines’ slopes to be \(\phi\) and \(1/\phi\); and we saw how the Fibonacci numbers were hiding all over the place. But one question lingers: why lines? We’ll answer this today.

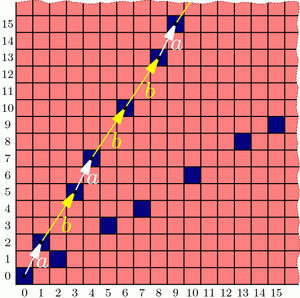
Two posts ago, we saw that if we take all of the (infinitely many) steps in the upper “V” branch and average them together, the result has slope \(\phi\). In fact, with a little more work we can compute this “average step” exactly, not just its slope: it is the vector \(v=(\phi,\phi^2)\).[1] Let’s compare these average steps, namely v, 2v, 3v, etc., with the actual ones:

Overlaying average steps on Wythoff's grid
Drawing a dot at each mutliple of the "average" step v reveals a perfect correspondence between dots and blue cells.

The dots and blue squares are perfectly matched! It seems that this may provide a precise way to easily locate all the blue cells in the upper “V” branch at once! And since the whole diagram is symmetric through the line \(y=x\), the lower “V” branch should be governed by vector \(w=(\phi^2,\phi)\) in the same way. Thus, a hypothesis forms:

Conjecture: The losing cells in Wythoff’s game are exactly those that contain an integer multiple of vector \(v=(\phi,\phi^2)\) or vector \(w=(\phi^2,\phi)\).

If we use the notation \(\lfloor x\rfloor\) for the floor function that rounds x down to the nearest integer[2], then this conjecture says that the nth blue cells on the upper and lower “V” branches have coordinates \((\lfloor n\cdot\phi\rfloor, \lfloor n\cdot\phi^2\rfloor)\) and \((\lfloor n\cdot\phi^2\rfloor, \lfloor n\cdot\phi\rfloor)\) respectively. (When \(n=0\), both formulas give (0,0).)

As we will see, this conjecture is indeed correct. How could we rigorously prove this fact?

To start, in a new grid, let’s color green all cells that fit our hypothesized formula, i.e., contain a multiple of v or w. Fill the rest of the cells with yellow. We now have two separate, a priori unrelated colorings of the grid: one with red/blue according to Wythoff’s game, and another with yellow/green according to vectors v and w.

Comparing Wythoff grid colorings
Two colorings of Wythoff's grid that we conjecture are identical. Left: the losing positions (dark blue) found previously by an iterative, optimal-play strategy. Right: multiples of vectors v and w (dotted) and their containing cells (dark green).

Proving the conjecture amounts to showing that these colorings are the same. We’ll accomplish this by showing that the yellow/green coloring behaves just like the red/blue one:

  • Endgame condition: The cell (0,0) is green.
  • Yellows win: From any yellow cell, it is possible to move to a green cell with one Wythoff’s game move.
  • Greens lose: From a green cell, there are no other green cells accessible with a single Wythoff’s game move.

We have already observed these three properties for the red/blue coloring, and we saw that they uniquely determined the red and blue cell positions. If we could show the yellow/green coloring follows the same pattern, we could conclude that the colorings are indeed identical. So we just need to check that our yellow/green formula satisfies these three conditions!

Now that we have set the stage to dig into the meat of this proof, it is time to bid farewell until next week. See you then!


Notes

  1. Indeed, since we know that a=(1,2) and b=(2,3) appear in proportion 1 to \(\phi\), the average step is \(\frac{1}{1+\phi}a+\frac{\phi}{1+\phi}b = (\phi,\phi^2)\). This can also be computed from the Fibonacci observations in the most recent post. []
  2. For example, \(\lfloor 2.718\rfloor = 2\), \(\lfloor 5\rfloor = 5\), and \(\lfloor -3.14\rfloor = -4\). []

A Golden Observation

Last week we saw that the best strategy for Wythoff’s game is to always move to one of the blue squares in the diagram below (if you can). We found the locations of the blue squares with an iterative algorithm that builds outward from (0,0), but we haven’t yet discovered the underlying pattern in how these blue cells are arranged. Let’s go pattern hunting!

As we noticed last week, the blue cells are arranged in a symmetric “V” shape, formed from two seemingly straight lines. What are the slopes of these lines? This is the question du jour.

Jumps in losing positions for Wythoff's game
Jumps between blue cells for Wythoff's game come in just two sizes: a=(1,2) and b=(2,3).

Looking more carefully, the upper branch of the “V” has only two types of “gaps”: consecutive blue cells are separated by either a “short” (1,2) step (a.k.a. a knight’s move) or a “long” (2,3) step. So, if we believe that this “V” branch is a perfect line, then that line’s slope should be somewhere between the slopes of these two steps, namely \(3/2=1.5\) and \(2/1=2\). Knowing more about how these steps are arranged will tell us more about the “V”.

Specifically, label these “short” and “long” steps as a and b respectively. What we care about is the ratio of bs to as. Why? For example, if there were an equal number of as and bs on average, then the slope of the line would be the same as the vector \(a+b=(3,5)\), i.e., the slope would be 5/3. If there were, say, two bs for each a in the long run, then the line would fall in the direction of \(a+2b=(5,8)\), with slope 8/5. Unfortunately, the ratio we seek is neither 1 nor 2; what is this magic number?

Let’s write down the sequence of jumps along our line. From the diagram above we see that it starts a b a b b a …, and using last week’s iterative algorithm, we can compute farther into this infinite sequence:

a b a b b a b a b b a b b a b a b b a b a b b a b b a b a b b a b b …

This sequence seems to be composed of “blocks” of (a b) and (a b b):

(a b)(a b b)(a b)(a b b)(a b b)(a b)(a b b)(a b)(a b b)(a b b)(a b)(a b b)(a b b)…

So for every a there are either one or two bs, meaning the ratio of bs to as is somewhere between 1 and 2. So the slope should be between 5/3 and 8/5. But what is it exactly? To answer this, we need to know how these “short” and “long” blocks are arranged.

Write A = (a b) and B = (a b b), so we can rewrite the sequence of blocks as

A B A B B A B A B B A B B …

Hold on; this sequence looks familiar. It’s exactly the same pattern as our original jump sequence! So it seems that the pattern of blocks is exactly the same as the pattern of the letters themselves! This is a “self-generating” sequence!

In particular, if the ratio of bs to as is some number r, then the ratio of (a b b) blocks to (a b) blocks is also r. But if we have one block of (a b) and r blocks of (a b b) then we have a total of \(1+2r\) bs and \(1+r\) as, so the ratio of bs to as is \(\frac{1+2r}{1+r}=r\). This simplifies to \(1+r=r^2\), and the solution is the shiny number \(r=\frac{1+\sqrt{5}}{2}\), known as the golden ratio and denoted \(\phi\) (Greek letter phi).

Now we know that our purported line should be in the direction of \(a+b\cdot\phi = (1+2\phi,2+3\phi)\), so the slope is \((2+3\phi)/(1+2\phi)=\phi\). And since our “V” shape is symmetric, the other line should have slope \(1/\phi = \frac{\sqrt{5}-1}{2}\). Done and done!

Well, yes and no. We found the slopes of the lines in the “V”, but why do they form lines at all? And what does all this have to do with the Fibonacci numbers?

Wythoff’s Game: Red or Blue?

Let’s play a game; just the two of us. We’ll need a (potentially large!) chess board and a single queen somewhere on the board. We take turns making queen moves, always making progress toward the bottom-left corner of the board. Specifically, in one turn we are allowed to move the queen as far as we want either straight down, straight left, or diagonally down and left (at a 45-degree angle). The first to land the queen on the bottom-left corner wins the game. If you go first and we both play as best as possible, who wins? Well, it depends on where the queen started.

If the queen starts at any of the light-red spaces in the diagram below, you can win on the first move by going straight to the bottom-left corner. On the other hand, if the queen starts at (2,1), then you’re sunk: any move you make lands on a red square and so leaves me in a position to win. So (2,1) is a losing position, indicated by dark blue shading. (The jagged edge reminds us that we could ask the same questions on much bigger grids.)

Wythoff's game: beginning analysis
If the queen starts on a light-red cell, you win on the first move. If she starts on (1,2) or (2,1) (dark blue), you lose.

What should you do if the queen starts at, say, (6,5)? Move to (2,1)! This leaves me in a losing position, so no matter how I respond, you’ll win. So once we find where all the blue losing cells are, your strategy should be: always move to a blue cell, if you can. What if you can only land on red cells? Then you must have started at a blue position, and you’re going to lose.

This also tells us how to find the losing positions, step by step. We know that (2,1) and (1,2) are losing positions, so any position that can reach these in one move is a winning position. But now (3,5) and (5,3) can only reach red cells, so they are blue, and in turn, anything that can directly reach (3,5) or (5,3) is red.

Wythoff's game: continued analysis
Finding blue cells step by step. Left: Because (1,2) and (2,1) are blue, any cells that can reach these directly are red. Right: (3,5) and (5,3) can only reach red cells, so we color them blue. This reveals even more red cells.

Continuing like this, we can fill up our board as follows:

Wythoff's game: completed analysis
Continuing step-by-step as above, all blue cells in the grid are revealed. What patterns can we find?

Interestingly, the blue positions seem to fit nicely into two straight lines forming a “V”-shape, but the exact pattern governing their placement is less clear (especially if we were to ask about larger grids!). Is there more underlying structure in the blue cells’ positioning?[1] How could we discover the pattern in their placement? And why does that line seem to have slope equal to the golden ratio, \(\phi = (1+\sqrt{5})/2\)?[2] Tune in next week to find out! In the meantime, be sure to play a few rounds of Wythoff’s game with your friends!


Notes

  1. Yes. We call that a leading question… []
  2. Correction: that is a leading question. []

A Balancing Fact

Enough geometry already! Let’s switch gears and explore an interesting phenomenon in balanced grid coloring:

Problem: The numbers 1,2,…,100 are written in order in a \(10\times 10\) grid. Some grid cells are colored red, and the rest blue, in such a way that exactly half the cells in each row and each column are red (call this a balanced coloring). Show that the sum of the numbers in red cells equals the sum of the numbers in blue cells.

Examples of Balanced Grids
Examples of balanced grids: each grid has five red and five blue cells in each row and column. By the problem above, the red numbers and blue numbers add to the same total in each grid.

How can we understand this question? Notice that each row needs five red and five blue cells, but the values in each row do not need to balance. Indeed, the first row of the first example above is very skewed toward blue: \(\text{red}=1+2+3+4+5=15\) and \(\text{blue}=6+7+8+9+10=40\). In fact, every row in that example is very skewed to one side or the other! But the fact that every column also needs five red and five blue numbers somehow forces these skewed row sums to cancel each other out. This is essentially what the problem asks us to prove.

A (Not So Great) Start

Here’s one idea: let’s just test all the balanced grid colorings! There can’t be too many, right? Let’s start small. How many balanced \(2\times 2\) grid colorings are there? (Each row needs 1 red and 1 blue.) Just two: the first cell is either red or blue, and everything else is determined from there (cf. binary sudoku). And each of these has a red sum and a blue sum of 5, so we’ve verified the problem for \(2\times 2\) grids. What about \(4\times 4\)? With a little work, you can compute by hand that there are 90 balanced colorings of a \(4\times 4\) grid (try this!). That’s already a lot of cases to check. For \(10\times 10\) grids, it turns out that there are 6736218287430460752 balanced colorings! Maybe it’s time to look for a different method.

A Solution

Here’s a method that does work. Start with a zero in each grid cell; the red and blue sums are certainly equal (they’re both zero). Now we’ll modify the values one row or column at a time. If we add 1 to each cell in a column, then the red and blue sums each increase by 5 (because each column is balanced), so the sums remain equal. Do this once in the first column, twice in the second column, and so on, resulting in the middle grid below (which must therefore have equal red and blue sums):

Solution to the Balanced Grid Problem
Adding the same number to each cell in a row or column of a balanced grid keeps the red and blue sums equal. Applying this process to an initially all-zero grid yields the desired grid of 1,2,...,100 and solves the problem.

Now modify the rows: add 10 to the second row, 20 to the third row, etc., finally ending up with the numbers 1,2,…,100 in order. Each step preserves the fact that the red and blue sums match, so we’re done! Notice that this argument works for any even grid size; 10 is not special here.

About This Problem

This problem appeared (with different phrasing) in the 2001 Putnam Competition, a very challenging mathematics competition for undergraduate students in the United States and Canada. This competition’s directories contain even more solutions and insights into this problem (Problem 2001 B1).