Scheming Colors

[This is post #20 in a mini-blog-post series for NaBloPoMo 2015. Jump to the first , previous, or next post.]

Yesterday I asked what differentiates one of these from the other two:

odd-one-out

The answer: color scheme! They all have 5 tetrahedra, one in each color, but they’re not positioned in the same way every time. The two Straws Thingys on the edges are identical, though it’s not apparent until we rotate one to match the other:

rotate-to-match

To avoid motion sickness, here’s that final frame again. Check that the colors match perfectly in the two assemblies:

identical

By contrast, when comparing one of these “original” Straws Thingys with the remaining “odd one out” (pictured above, center), the colors refuse to match up, try as you might to rotate them into alignment. We can get pretty close, though: below, only green and yellow have swapped places. (The “original” is on the right, with the “odd one out” on the left.)

color-swapped

Does this mean we get a third unique color scheme if we swap, say, green and blue instead? How many colorways are possible in total? Let’s investigate this tomorrow.

Odd One Out?

[This is post #19 in a mini-blog-post series for NaBloPoMo 2015. Jump to the first, previous, or next post.]

Congrats again on finishing your Straws Thingy! (If you had or are having trouble, please let me know.)

During the next week we’ll prod more deeply into a few features of this sculpture’s symmetries, especially those that become apparent during construction.

odd-one-out

To begin, a puzzle: all three of these Straws Thingys were built precisely according to the instructions outlined earlier, and yet, they’re not identical arrangements! What differs?

This is not meant to be a trick question: their dissimilarity is clearly visible in this image without zooming in or guessing. And in fact, two of these three are identical. Who’s the odd one out? Are there other ways this difference can manifest?

Step 8: Tucking and Weaving

[This is post #16 in a mini-blog-post series for NaBloPoMo 2015. Jump to the first, previous, or next post.]

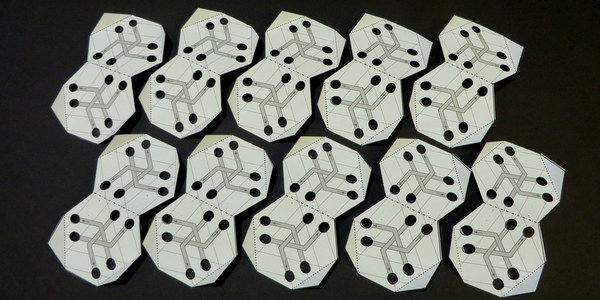
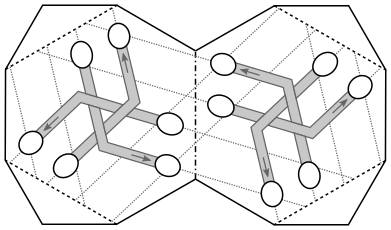
The straws are in space—I mean, in place—so now it’s time to tuck them into each other. The template is here to help once again: the thick gray elbows draw our desired weaving, showing not only which straws connect where but also which straws are above/below in the weaving. Here’s an overhead view of the result:

woven-corner

And here’s the play by play: stick one of the short straw ends into the slot waiting for it on the other side of its elbow, making sure to insert it all the way to the flexy bits:

tucking-one-straw

Repeat for the other two straws, carefully referencing the template as you go:

tucking-three-straws

Be warned: if you don’t get the weaving quite right (e.g. the straws aren’t paired up correctly, or the over/under pattern is backwards), the scaffold may get upset, and this petulance may be expressed by straining or ripping. This is fixable! Just apologize to the scaffold in a soothing tone, undo the straws without sudden movements, and try again. The scaffold may also rip even when you are weaving correctly, and this too is normal. Just double check that they match the picture and keep going.

Repeat for the other three corners, and the tetrahedron is finished!

finished-tet-in-scaffold

Step 7: Straws in Spaaace!

… three-dimensional space, to be precise.

[This is post #15 in a mini-blog-post series for NaBloPoMo 2015. Jump to the first, previous, or next post.]

Now that the scaffold is complete, let’s use it! Find your straws; today we’ll use just one of the five colors. Make sure they are already cut or creased as described in Step 1 few days ago.

crease prep

To insert a straw into the scaffold: the long end of the straw enters at an arrow,

insert-at-arrow

and it tracks the dotted gray line, emerging only when this line ends:

follow-dotted-line

This is important: each and every straw will be inserted with this same recipe, and you don’t want them in backwards, so here are those steps again:

Insert the long straw end at an arrow, and follow the dotted line to the exit.

Let’s do the same to the other two arrows on the same hexagonal face:

all-on-face

Now there are four faces touching these three straws: the one whose arrows we entered with, and the three we exited from. The pink straws will touch only these four faces! So all that’s left to do is repeat with these other three. Here I’m using three more arrows on a second face (before and after):

second-face

And here’s the result with all 12 straws inserted into all 4 faces:

all-twelve

Tomorrow we’ll close up the corners to finish our first tetrahedron!

Step 6: Pentagons Galore

[This is post #14 in a mini-blog-post series for NaBloPoMo 2015. Jump to the first or previous, or next post.]

Three Dee, guys! We’re so close I can taste it! (tastes like paper…)

Take five of your finished scaffold units and lay them out in a star like this.

arrange-in-star

We’re going to staple the tabs together in pairs, to create a 5-sided hole in the center. Here’s the first staple:

first-staple

And here are the other 4:

finished-half

It won’t lie flat, and that’s exactly what we want! Lather, rinse, repeat with the other 5:

finished-halves

These are two halves of a sphere that we’re now going to join together. Form another pentagonal hole by stapling one scaffold unit from one half (bottom) between two other scaffold units from the other half (top):

join-halves

All that’s left is some good old-fashioned pentagon hunting. Any time you see a five-sided hole that looks like it wants to close up, help it along! When you’re done, you should be staring at a soccer ball:

finished-scaffold

And that’s the finished scaffold! Great job!

Step 5: Punching and Folding

[This is post #13 in a mini-blog-post series for NaBloPoMo 2015. Jump to the first, previous, or next post.]

Keep yesterday’s stacks stacked, because we’re starting today by punching out the oval holes. (This goes much faster 5 layers at a time!) Two punches per oval, one at each end, works very well:

punch-twice

Repeat on all the ovals.

punch-all-holes

Next, fold the stacks on the creases as shown: down (mountain fold) in the middle, and up (valley fold) for the four tabs.

fold-stacks

We can finally undo the stacks with a staple remover (or simply by undoing the binder clips), and our units are complete!

separate-stacks

Tomorrow we get to assemble them!

Step 4: Cutting and Stacking

[This is post #12 in a mini-blog-post series for NaBloPoMo 2015. Jump to the first, previous, or next post.]

Straight to work today! Make sure you have printed the template at Actual Size or 100%; don’t let your printer scale it down.

scaffold-template

Find your scissors, because it’s time to start cutting! I find it easiest to start by cutting the rectangles around each piece:

cut-rectangles

Next, form two stacks of 5, and make sure they’re lined up well. Secure with binder clips (left) or a few staples (right). Be careful to avoid the ovals when stapling!

fasten-stacks

Now we can trim the stacks to final shape.

cut-profile

Don’t undo the stacks quite yet! They’ll be handy when punching holes and folding creases tomorrow.

Step 3: Scaffolding!

[This is post #11 in a mini-blog-post series for NaBloPoMo 2015. Jump to the first, previous, or next post.]

Hi, guys, let’s keep going! Step 3 comes in two parts: first, ignore Step 2.

OK, don’t ignore it completely. The difficulties it raises are real—the arrangement is tricky, and the straws just don’t want to stay put. So here’s my solution to both at once: Scaffolding!

To make this project as accessible as possible (without losing the thrill of the build!), I designed a paper scaffold that helps guide the straws’ arrangement and also helps keep the straws in place during assembly. You can obtain the scaffold template by clicking “Add to Cart” below, for a fair price.

template-image

Now, about the pricing: First and foremost, I want these plans to remain easily accessible, and therefore available for free (yes, free!). If you aren’t comfortably able to pay for these plans, please don’t—use the free option. Otherwise, a few dollars (or whatever you consider a fair price!) would be greatly appreciated, and would go a long way toward my endeavors to create and share more projects like this. Thank you!

Finally, here’s the second half of Step 3: Click “Add to Cart” above to download and print the template. Then, gather the other supplies we’ll need: scissors (or hobby knife), hole puncher, stapler, and staple remover (in case of emergency!).

supplies